Wednesday, August 31, 2011

How To Make a Pillow : Envelope Back Enclosure


Welcome to my first of two pillow tutorials! I first shared this one a few weeks back at The Crafty Bee, a sweet blog written by an equally sweet gal from Montreal!

Accent pillows are the greatest way to add colour, texture and inject some trendiness into your home.
And they don't cost a lot to make, usually one pillow requires about 1/2 yard of fabric. So to splurge on a  some high end fabric for one pillow can be feasible!


I had a fabulous high school sewing teacher who taught me all I know. I always say to anyone who is discouraged and intimidating by sewing, "If you can sew a straight line, you can sew." All it takes is patience, time and a good iron. Why a good iron? Using an iron throughout makes your project look crisp and professional.

Now onto sewing a pillow....

The key to a good pillow is to pick the right fabric. Make sure you use a good upholstery weight fabric or heavy cotton. This will ensure a nice crisp pillow.

Materials needed:

Fabric
Coordinating thread
Buttons
Pillow insert {I like to use down, the best deal in town is Ikea - $6!}
Sewing machine
Iron

How-to:

1. Measure your pillow insert. For front side of the pillow add 1" to both sides. This will allow for a half inch seam allowance. For the back side you will cut two pieces that will create the envelope back enclosure. For the width, add 1". For the height, add 4". 


2. You will now iron and sew a hem on the wide edge of the two pieces. Fold over 1/2", then another 1" to create a hem,  this will be where they overlap to create an opening.


3. Overlap and pin the two hemmed edges as shown in picture.


4. You can either stitch the edges of the enclosure to create an opening OR if you want the Sarah Richardson look you can sew buttons and buttonholes to keep the enclosures closed.


5. Buttons and buttonhole option:

Measure where you want your buttons to lay. I used three buttons. A rule I learned in my short stint at fashion design school was odd numbers look best to the eye.


6. Sew the buttonholes, on one piece along the hemmed edge. Snip open.


7. Sew buttons on other hemmed edge, lining up with the buttonholes.


8. Mark and stitch the opening of the back.


9. Lay the front and back pieces, right sides together, matching corners. Pin and stitch along all four sides. I then trim the corners and zigzag the edges of the seams.


10. Turn right side out and iron to give a nice crisp edge.


11. Insert pillow and then voila!


Hope you will try to make one for yourself!

On Friday I will show you how to make a pillow with an invisible zipper!


If you have any questions about this tutorial, feel free to email me:
barbaras{dot}hodgepodge{at}yahoo{dot}ca

XO Barbara

Monday, August 29, 2011

Simply Divine


Yesterday a reader, and one of my newest followers {thanks Mary Ellen} sent me an email asking where I got my colour bird fabric from? I dug up the post from the archives, and found half the images missing. 

Darn Blogger.

 I realized the colour ways of my favourite fabric is not being carried, so if the image is removed from the original site, it gets removed from mine as well. Next time I need to download the image not copy the URL.

The fabric in question is the one I used  make a lumbar pillow for our slowy-being-worked-on games room.


Fortunately for Mary Ellen, House of Fabrics still carries the fabric I purchased. While I was searching through their site, I discovered they carried the fabric, Lucy, in this colour


Cue: Angels singing...

 I just about melted on the spot. 

 Do you ever get that way when something so beautiful, so utterly divine, is right before you eyes? Yes, fabric tickles my fancy. I hoard collect fabric {just ask the husband, actually don't, as I hide piles around the house}

Maybe I shouldn't be sharing this with you. I don't want you all to rush out and buy it. 


This week is going to be pillow week. I have two great tutorials to share, making pillows with an envelope back enclosure and using an invisible zipper.

Also I made another pillow with the second memo of Chiang Mai Dragon I have had for a while.


. Can't wait to show you how I dealt with those silly grommets with this pillow.

Speaking of Chiang Mai, have you seen what Mr. Goodwill Hunting had made? You need to hop over and see!

XO Barbara

Sunday, August 28, 2011

So Canadian eh? : Gabrielle Savoie


What I love about writing this series is discovering talented Canadians that not only live in Canada but in other parts of the globe!  When you live in another country you are able to view Canada through a different lens because you are outside the cultural milieu that influences your day to day living. So I find it fascinating to talk to a Canadian that makes his or her home outside of Canada, like our family did for a few years.

So I give a warm welcome to Gabrielle Savoie from Savvy Home!


She is


Gabrielle hails from Adelaide, Australia but is originally from Montreal, where she briefly studied design before switching her career direction. Clearly design is her passion, her blog always provides us with a daily dose of inspiration.

Gabrielle sent me some photos of her place in Australia and from Montreal. Love the differences between the two. One space colourful while the other has that loft look you would expect in Montreal.

Love how she uses shoes as design accessories in front of her fireplace in Australia.


Bedroom in Montreal.


Montreal.


Australia.

Her fabulous kitchen.


A few vignettes around her place.
I love the tray and are those black and white striped napkins or coasters?
Hello! Love them.


And Gabrielle has been honing her interior design skills by helping a friend re-decorate her space...


Tell us a bit about yourself, your background, your education, has design always been something you are drawn to?


My father is an architect turned full-time artist, and my mother works in music and media, so I juggled with both career paths, but I've always had a real soft spot for design...

From a really young age I was fascinated by my dad’s architectural drawings and I would try to replicate them to design my dream house. Then I started constructing houses for my Barbie dolls and eventually moved on to rearranging my own room every month or so!
I finished high school at 15 and went on to study Interior Design but eventually got discouraged by teachers repeatedly telling us that we would only earn $25,000 a year as interior designers! So I followed my mom’s footsteps and majored in Communication Studies at Concordia University in Montreal. I'm really happy that I went and studied media, but now that I've graduated, I'd love to go back and finish my Interior Design course!

What made you decide to start blogging?

I started blogging 9 months ago when my partner and I moved into our first home. I wanted to document the process of making a house together, keep track of my inspiration, share the progress on our house, and keep friends and family informed of what I was getting up to in Australia. It was also a great way for me to channel my creativity and to reintroduce a bit of design spice in my life!

What have you enjoyed about blogging and what has surprised you along the way?

Blogging takes a lot of time and consistent effort, but I would never give it up! I believe that blogging opens so many doors! It's a great networking tool and it forces you to work a little bit every day at crafting your professional image, keeping up to date with the industry and exercising your skills which is really important as a young professional.

It’s also incredibly rewarding to have strangers compliment your work, comment on your posts, and in some cases become real life friends! I'm hitting new milestones every month and find it incredibly exciting to see where this little adventure will take me next!

Where do you go for inspiration for your blog?


Inspiration is everywhere! My travels have really inspired and influenced me, but something as simple as the colors in the sky continue to inspire me everyday. I think you just need to be attuned to what’s around you.

Of course I also read countless shelter mags and blogs on a daily basis. In fact, I file dozens of inspiration images everyday. It’s a bit OCD but it’s allowed me to learn a lot about designing, styling and decorating.

I find myself going back to Spanish mag Nuevo Estilo, and the New York Social Diary House section for great interiors. Both publications have a real knack for featuring interiors that feel lived-in and tell the owner’s story as opposed to looking staged.

What do you do for work? Is it design related?

I actually work in website development which is ironic because I never get around to taking care of my own
website… I’m also quite busy with decorating projects. A few of my friends have asked me to help decorate their house and it’s a lot of work on top of a full-time job and a full-time blog!

What are your hopes and dreams for the future?

I have way too many plans for one lifetime. As a first, I would love to finish my interior design course and get the opportunity to work and learn with a great designer. I studied media in the hope of working for a magazine so I’d love to collaborate in a shelter mag. I also want to start a business someday, but I have a lot to learn first. I have always wanted to work for myself. And when I’ve achieved all of this, maybe I’ll write a book!

How would you describe your design style?

My style is very eclectic as opposed to “decorated”. I’m not a matchy-matchy person. I’m drawn to a mix of quality classic furniture, mid-century classics, a great art collection, a fresh mix of colors, and comfort! I hate interiors that look uncomfortable.

I guess my style might be best described as a bit neo-traditional. But most importantly my style is very personal - it reflects me as a person - it's influenced by my travels, my friends, the art I'm loving, the music I'm listening to and it’s ever-changing.

Tell us one thing about you that would surprise us?

As part of my eclectic career path, I worked as a marketing coordinator for a Canadian record label in Montreal and helped release albums that you may have sang along to in your car...

I was also prom queen – although never really understood why – I was definitely not your typical popular girl in high school!

If you were given the opportunity to meet anyone or do anything, what would it be and why?

This is such a hard question because I’m the type of person that would like to do everything and meet everyone. Let’s just say that my dream dinner party guest list would include a few successful women (Margaret Russel, Kelly Wearstler, Kelly Hoppen, Michele Nussbaumer) because I'd love to pick their brains; and a few funny men (Woody Allen, Will Ferrell, Owen Wilson, Jack Nicholson) because I love to laugh. If I could bring people back from the dead, I would throw a few musicians and artists in the mix as well (Miles Davis, Matisse, Giacometti, Johnny Cash)… I think it would make a fun night!

What do you like to do in your free time?

I love the outdoors. I get a bit cranky when I'm stuck inside. I love to go for long drives on weekends. South Australia has so many beautiful coasts and wine regions to discover and they're all a stone's throw away so I make the most of it. I go with friends or with my partner. We stop for lunch, or wine tasting or antiquing – small towns are gold mines for second hand treasures! I’m also fairly active. I go for runs down the beach or go for hikes in the hills nearby: it’s great for spotting the occasional koala in its natural habitat…

And when I’m back home, I go snowboarding.

You are currently a Canadian living "down under" in Australia, do you find the approach to design different there? If so, share your thoughts.

There are many differences between Australian and Canadian design. We think Canada is a new country but Australia is even newer! I think this is reflected in their contemporary aesthetic. Kitchens and bathrooms here tend to be a lot less traditional than in Canada here and open plan living is the norm.

Australians have also mastered the art of outdoor living and entertaining, probably because Australia is such a warm and sunny country. Our design truly reflects our lifestyle and our weather!

Your first language is French, you were born in Montreal, and do you think that French Canadians have a different design aesthetic than English Canada?

Canada is a big country and so I think design aesthetics change slightly from one province to the next, not just from French to English Canada. The Atlantic provinces, where my parents are from, draw a lot from the coastal New England aesthetic, whereas I've always imagined British Columbia as more contemporary and eco-friendly. Montreal has very strong French influences and some Scandinavian influences too (probably because of the similar weather!) but overall, I'm sure we're not all that different!

13. What are your views on the role Canadian design plays in the world design scene? Do you feel that Canadians have a unique sense of style and design, and if so, what is it that you think sets us apart?

I think that even though design is becoming increasingly global and Canadians draw on other countries' aesthetics, Canada does have a bit of a unique style: think of the famous Hudson Bay blanket! It’s everywhere these days!

I think of Canadian design as a blend of rustic and contemporary: wood beams, stone fireplaces and wool blankets mixed with the North American commodities… I also think that touches of worldliness in Canadian homes have been in our aesthetic for quite some time, well before the suzani blankets and berber rugs. It reflects our openness as a nation.

Thanks for visiting Gabrielle and for all your design insight! Amazing how we are all separated geographically yet through the internet, and more specifically through blogs we feel such a sense of connectedness.

Hugs.

XO Barbara

Friday, August 26, 2011

Blog Swap with Homemade Ginger

Today I am doing a blog swap with Megan from Homemade Ginger, another fabulous DIY blog. You can find me over at her blog sharing a DIY goody from the hodge:podge vault!


 Megan is sharing her amazing living room transformation that went from blah to WOWZA! 


Take it away Megan....

I'm so exited to be sharing with you all today! Thanks so much to Barbara for having me and doing this little blog swap. She is sharing a super cute project over on my blog, so be sure to head over there to check it out.

 A can of primer and a can of paint...and some leftover blue wall paint from the kitchen, that's all it took to transform our living room.  I absolutely love how it turned out. I've been wanting to paint our fireplace since we moved into our house a little over 1 1/2 years ago.  Get ready for some amazing before and after shots!

To be super dramatic, this is what the living room looked like when we bought the house:


BEFORE

Lovely dark wood paneling everywhere and really nasty carpet.


Then, we painted the walls and wood. The sellers put in hardwood floors...


A huge improvement! This is how it has looked for the past 1 1/2 years.  


Then, after looking for a bigger area rug for that long, I found this one for super cheap:


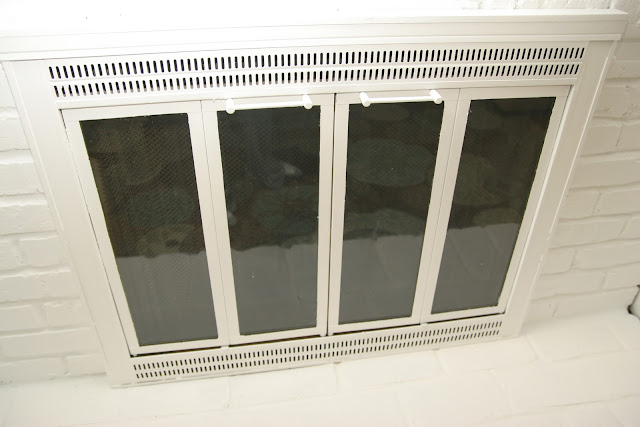
So, we added the rug which really helped...but I still haven't liked the brick fireplace and ugly brass and black fireplace screen...


It took some convincing, but finally Reid was on board with the idea. Don't get me wrong, I do love exposed brick in some settings...but not here.


I also had the idea of using some leftover soft aqua paint from our kitchen to paint the backs of the shelves. I figured it would make the objects pop...


Ok, get ready...


AFTER

Ta Da!!


It makes the room feel so much brighter, airy and modern!


It really only took one coat of primer and one coat of paint.


And the larger area rug makes a world of difference.


The most annoying part of the process was painting in between each brick with a brush before rolling on the paint.  If you attempt this, use an old brush that you don't care about because it will be destroyed by the end.


I had fun rearranging some objects and adding in a lot of white things to showcase them against the now blue backs of the shelves. (recognize that owl?)


I even spray painted some old picture frames white to keep everything bright.


The fireplace screen needed a few more extra coats of paint. It's not as smooth as I'd like it to be, but you don't really notice unless you are up close. Maybe we will eventually get a new one, but this does the trick for now.


We just had to use a razor to scrape the excess paint off the windows.


So, if you have brick you don't like, go paint it! It's a little gutsy, but totally worth it. 

To recap the project...

BEFORE:


AFTER:


* I just used regular latex paint and primer for this project and it has held up perfectly so far!


Next, we will tackle those beams...and hopefully paint the ceiling fan.. But, that will require a very high ladder and some upper body strength. :)

Has anyone else had brick painting success?

Wow! 
The power of paint!


XO Barbara

Wednesday, August 24, 2011

Inspiration : Mediterranean/Moroccan style decor Ideas

If you love vibrant and exotic colors, and have a taste for stylish and elegant furnishing, Moroccan decor is a beautiful choice! The intricate detailing on furniture, mosaic accents, rich jewel tones..all of them elements of this beautiful Mediterranean decor.

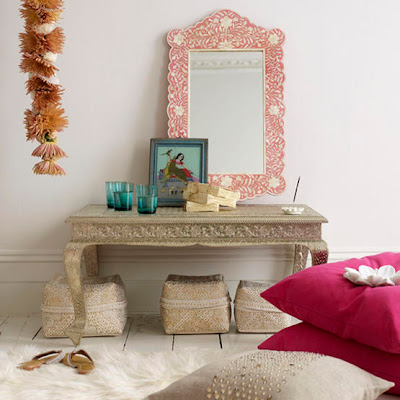
This is such a gorgeous setting! The touch of exotic in a simple setup. I love the flowers, the mosaic mirror, the straw storage boxes. The color palate is chic without being overwhelming. Stacked floor cushions and the carpet are important elements of Moroccan style decor. Bone white with the pop of fuchsia.


The Moroccan style furniture are low with simple, clean lines. The detailing on the furniture and the elaborate upholstery adds to the richness. The living room setting is so inviting. It would be perfect for hot summer months to laze around with friends. The best of elegance without compromising on comfort!


The shade of blue is the focal point here. It reminds of the sea and the lovely luxuriant yellow and rose pink add to the sophistication. There is another theme going with the beautiful marble inlay work furniture. The details are beautiful and shines in the day light. Ornate and intricate!


The colors used in Mediterranean/Moroccan style decor are beautiful, rich and luxuriant. The jewel tones with the shimmer of gold and silver in beautiful silk can be recreated in satin. Moroccan lamps with infuse any corner with an exotic feel. Use simple elements in your home decor, add a little bit of drama and excitement!


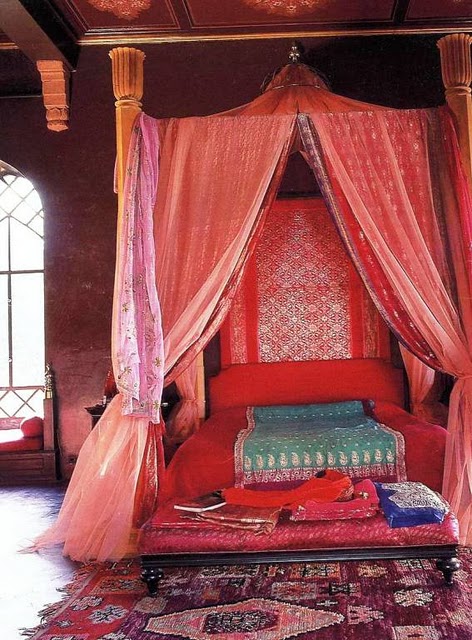
This bedroom has all the elements of Moroccan style decor. Low furniture design, lush extravagant upholstery, colorful intricate accents, heavy carpet and a beautiful surreal feel. The bedroom is right out of a fairytale. Its like an experience in itself.


The design above is traditional Moroccan style. This is a more modern take on it. Instead of adding all the curtains and canopy the walls are textured and painted a beautiful shimmery rose pink. The pendant lamp adds the soft dim light. The color theme is reflected in the bedspread as well as accent lamp. It is luxurious without being overwhelming. 


Another modern design with includes some pretty elements from the Moroccan style decor. The lovely mosaic mirror is the focal point. Unusual coral pink dresser add to the mystique. The furniture is modern, yet with the lovely rug thrown in the design is elevated to a contemporary Mediterranean style


If you are unsure about using elements from this style inside your home, convert your patio into a lovely Moroccan bazaar tent. Your guests will be delighted!!! Its not only pleasing to eyes but totally functional. Love the ombre curtains and the luscious use of pink and white. Very pretty!!


Try using some elements of this beautiful style in your home decor. Moroccan style lamps and ornate mirrors are easy to find and lovely to incorporate. Start with a corner and if you like it, incorporate some more elements. Find your own mix of fabrics, accents and colors. Designing and decoration a home is a never ending passion!!