Showing posts with label paint. Show all posts

Wednesday, September 14, 2011

Striped Walls & Rub'N'Buff


Thank you to all who left such flattering comments on Monday!!

 I am glad you like the walls. My daughter is so pleased and her friends that came over thought they looked fantastic. Now we just need to add the finishing touches on the space, art work and drapes.

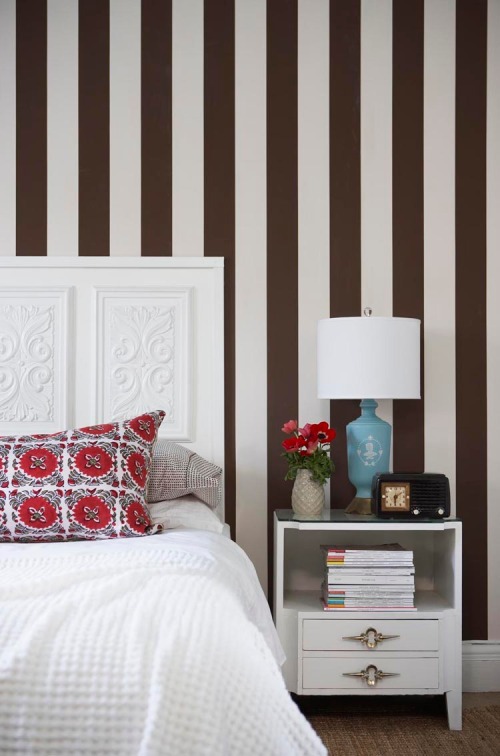
This was our inspiration:


It is Michael Penney's first apartment, a former Canadian House and Home designer and now works for Sarah Richardson {lucky guy}

His stripes were actually wallpaper, but since we are renting, wallpaper is out. What better way to add a bit of character to my daughter's space than a striped wall. 


I am glad no one notices the "mistakes", my husband had fun pointing them out a few hours after the tape came off.  Little does he know, the next time I decide I want stripes on the wall, he is helping!

A few of you commented that you liked the "black and white" stripes, when in fact the colour is a deep rich brown called Black Bean Soup by Benjamin Moore. The photo doesn't do the colour justice. 

 I guess it is almost black but not quite. 
I love the look of the brown and white.

As a matter of fact, it is such a crappy photo - the high ISO setting on my non SLR camera makes the photos grainy. 


I was also asked about how I painted the walls, what tape did I use, etc. That deserves a post of it's own, so hopefully I can get my act together tomorrow and write up my tips.

Another question asked was, where I did I find the "Rub'n'Buff" that I used on the hardware of the dresser?


I couldn't find it at Michaels or Home Depot. After looking online, I found it at my local art supply store, Opus Art and Framing. Opus can be found in various locations throughout the Greater Vancouver area.
I also found it here.

It comes in many metallic finishes and I used "Antique Gold". This stuff if amazing. I used an old toothbrush and rag to rub it on and buff. You only need a minuscule amount. A little goes a long way.
And it dries quickly!


The possibilities with this stuff is endless. I also gilded a few frames, which will be part of the gallery wall!

Have you ever used this? If so, what did you use it on?

XO Barbara
Monday, September 12, 2011

Sneak Peek


I am going to do it again.

Just give you a peek into the progress of my youngest daughter's room. The stripes are done!

Not without some frustrating moments and with buckets of patience. All you commenters were right, stripes are a challenge.

I went about it not rushing and taking my time. I can see my mistakes {thanks to the hubby for pointing them out - er - next time darling - you are helping} but in the end it was just what I envisioned.

Don't you love it when the vision you have in your head unfolds before your eyes! Exciting.

So here is a peek at the walls. 

Just in case you want to know: The base coat was painted White Dove {Benjamin Moore} and Black Bean Soup {Benjamin Moore} but I get my paint colour matched at Home Depot in Behr paint. I have found the Benjamin Moore Aura paint doesn't hold up over time. 


Another peek. I had fun with rub'n'buff! 
Have you ever used the stuff?

Love it!


Hope you had a fabulous weekend. 
Mine was busy and full of fun, the highlight was attending the Taylor Swift concert with my youngest daughter and friend. It was such an amazing concert!

XO Barbara

Tuesday, September 6, 2011

Busy Painting


With school upon us, the organizational bug has hit me. After a summer of leisure, tackling my to-do list has come to the forefront. I spent last week organizing schedules, sports, school supplies, buying a dress for my daughter's upcoming grad cruise {which is a miraculous feat to find a dress for a 6 ft tall girl!}, helping my parent's pick out paint colours for their new house, work on the design scheme for my first "clients" and finally paint my fabulous Craigslist find!

The weather is warm, which makes painting a breeze. 

Here is what I started with:
{somehow I can't find my "before" photos, I know I took them...}


And here is a peek at the hardware with a coat of spray paint. Tomorrow I am going to glam up that hardware with the midas touch.


You didn't think I would show you the whole thing finished did you? 

You will just have to wait, along with my daughter who is patiently waiting for her new dresser
and newly painted walls with a fabulous wall treatment!

More to come.....

Now I am off to wait for my "baby" to come home from his first day in high school.
All three of my children are in high school, my oldest graduates this year.
Sniff.....

XO Barbara

Friday, August 26, 2011

Blog Swap with Homemade Ginger

Today I am doing a blog swap with Megan from Homemade Ginger, another fabulous DIY blog. You can find me over at her blog sharing a DIY goody from the hodge:podge vault!


 Megan is sharing her amazing living room transformation that went from blah to WOWZA! 


Take it away Megan....

I'm so exited to be sharing with you all today! Thanks so much to Barbara for having me and doing this little blog swap. She is sharing a super cute project over on my blog, so be sure to head over there to check it out.

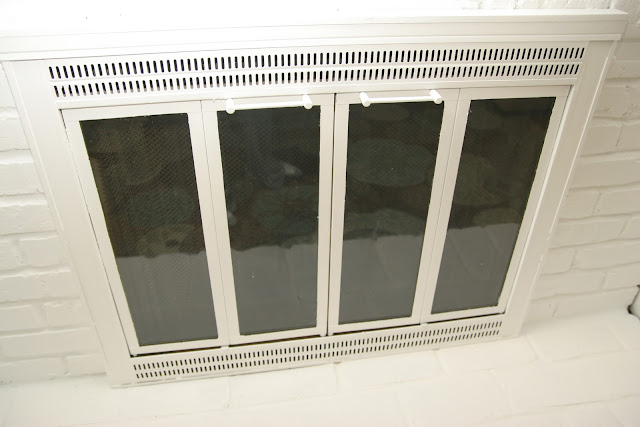
 A can of primer and a can of paint...and some leftover blue wall paint from the kitchen, that's all it took to transform our living room.  I absolutely love how it turned out. I've been wanting to paint our fireplace since we moved into our house a little over 1 1/2 years ago.  Get ready for some amazing before and after shots!

To be super dramatic, this is what the living room looked like when we bought the house:


BEFORE

Lovely dark wood paneling everywhere and really nasty carpet.


Then, we painted the walls and wood. The sellers put in hardwood floors...


A huge improvement! This is how it has looked for the past 1 1/2 years.  


Then, after looking for a bigger area rug for that long, I found this one for super cheap:


So, we added the rug which really helped...but I still haven't liked the brick fireplace and ugly brass and black fireplace screen...


It took some convincing, but finally Reid was on board with the idea. Don't get me wrong, I do love exposed brick in some settings...but not here.


I also had the idea of using some leftover soft aqua paint from our kitchen to paint the backs of the shelves. I figured it would make the objects pop...


Ok, get ready...


AFTER

Ta Da!!


It makes the room feel so much brighter, airy and modern!


It really only took one coat of primer and one coat of paint.


And the larger area rug makes a world of difference.


The most annoying part of the process was painting in between each brick with a brush before rolling on the paint.  If you attempt this, use an old brush that you don't care about because it will be destroyed by the end.


I had fun rearranging some objects and adding in a lot of white things to showcase them against the now blue backs of the shelves. (recognize that owl?)


I even spray painted some old picture frames white to keep everything bright.


The fireplace screen needed a few more extra coats of paint. It's not as smooth as I'd like it to be, but you don't really notice unless you are up close. Maybe we will eventually get a new one, but this does the trick for now.


We just had to use a razor to scrape the excess paint off the windows.


So, if you have brick you don't like, go paint it! It's a little gutsy, but totally worth it. 

To recap the project...

BEFORE:


AFTER:


* I just used regular latex paint and primer for this project and it has held up perfectly so far!


Next, we will tackle those beams...and hopefully paint the ceiling fan.. But, that will require a very high ladder and some upper body strength. :)

Has anyone else had brick painting success?

Wow! 
The power of paint!


XO Barbara

Tuesday, June 28, 2011

Re-painting Again


After moving my daughter into her current bedroom during the Great Switch, we painted the room the same lavender-gray, African Violet by Benjamin Moore, she had in her previous space. Her previous room was north facing with not a lot of natural light so the colour was quite muted. In her current room, we find the lavender really comes out with all the light that filters in. The walls especially read "purple" since we hung up the Roman blind. She really likes the vintagey look we are going for with her turquoise end table and diamond tufted headboard. The fabric we chose isnt working with the current wall colour so we will be re-painting again.

Fabrics:


The bottom fabric.


This photo is our inspiration for her back wall:

Source

So while the kids are off visiting their grandparents farm, I will be painting up a storm!

XO Barbara


Wednesday, April 13, 2011

The Tale of Two Tables


*This blog post is brought to you buy two thrifting pals, who never leave a thrift shop empty handed! 
If you want to read the other half of the story you can read it here.

Once upon a time in a land far, far away, where the rain falls freely, giant trees tower above, snow covered peaks loom and the ocean waves crash upon the shore...

Two blogging and thrifting pals, Barbara from hodge:podge and Carol from The Design Pages, were on the hunt for an end table for their lovely daughters. While on one of their thriftting excursions they hunted high and low for the perfect table, one that had good "bones".  But alas, they came away without finding that perfect table {but they found other treasures, that is a another story for another day}

Sniff....

The one friend decided to search Craigslist to see what she could find. One stormy evening she stumbled across a bedroom set that had the perfect pair of end tables. She emailed the seller and asked if they would be willing to separate the set. The seller said "yes". Quickly,  the ever-so-excited-friend emailed the other friend a link and asked if she was interested. $50 bucks for the pair! 
"Why yes!!!" she said, "how perfect!"

The thrifty gals took their tables home and worked their magic on them, transforming them from their 70's lacquered horror to glamourous side tables fit for their princesses.

They went from this:


To this:


Carol  painted her table with a glossy black paint and silver leafed the top and handles to create a table fit for a queen.

Want to know her costs? And how she did it? Visit her blog to find out more.

Want to know how I worked my magic? 


My costs:

Table: $25
Paint: 1 quart Behr indoor latex in satin finish, $18
{colour matched to Benjamin Moore's Spectra Blue}
Primer: Benjamin Moore's oil-based primer, already had on hand {cost $18}
Sealant: Diamond Finish Sealant in satin by Varathane, already had on hand {$14}
Handles were left as-is

Total cost: $34

How I did it:

Using a power sander I sanded the surface of the table as the finish was quite damaged. Then I painted on a coat of oil-based primer with a foam roller for a nice smooth finish and using a foam brush for the crevices. Next, I painted the table with 2 coats of the Behr paint, using a foam roller and good quality paint brush.  Finally, using a foam brush I painted on 3 coats of the Varathane sealant.
Screw back on the handles and 

voila!


And this table lived happily ever after.

The End

xo Barbara

Tuesday, April 5, 2011

Re-vamped Chair

Remember the saga of the one chair I was painting?


First the paint bubbled.


Then the black and white fabric looked "off"


After a few coats of black spray paint, it now looks fabulous!


I managed to get some quick shots on a rare sunny day.

If you were looking forward to the next part in Painting Furniture 101, I hope to have it up towards the end of the week. Mother Nature is not cooperating, we actually had sleet yesterday! Too cold for my latest painting project where I was planning to photograph and share the nitty gritty in painting! 

Thanks for all who stopped by to read my latest "So Canadian, eh?" interview with Margot Austin, it was such a pleasure to get to know the person behind all those amazing design stories at Style at Home. 

I have so many more amazing Canadians lined up in the next coming weeks, some who are very well known, make sure you stop by!

XO Barbara

Friday, April 1, 2011

Painting Furniture 101: Paint


Glad you came back for painting 101!

 The focus for today's post is the type of paint I use to paint furniture.

Like I mentioned in yesterday's post, the type of piece I plan on painting is what determines what type of paint I am going to use.

For smaller items, pieces with curves, nooks and crannies and smaller surface areas I will use spray paint.
Spray paint can be used to paint so many surfaces. 

Items I have painted are plastic garden pots, picture frames, chairs, trays, brass lamps, fireplace screens, baskets, ceramic ktochkes, lamps, etc.

I love using spray paint, it is the quickest and easiest way to transform furniture and accessories.


Since spray paint colours are limited {at least at my hardware store} I usually use spray paint if I don't need a specific exact colour, that is why a paint sprayer would be so nice! My go-to colours are usually black or white. I have used silver and bronze, but find the patina is too shiny so I "dull" the colour by rubbing black paint and wiping off to give it a more aged patina, like I used on my antique mirror. 

When I decide to roll on paint, here are the few types I use. 

First: Primer

I prime almost ALL surfaces. Primer is the best way to get a smooth and professional finish. It also minimizes paint wear and chipping. Most importantly it helps the paint adhere to the surface.

The type of primer I use for 90% of my projects is an oil-based primer.
The reason I use an oil-based primer is that most Craigslist or thrift store finds have an unknown finish and usually some unknown awful laquer or varnish.
A latex primer would just peel off.  

The beauty of oil-based primer is that you can use latex paint on top!
So if you know your piece was painted with oil, you can paint on the oil-based primer and then top with latex paints! Perfect solution -no need to sand away all that oil based paint or varnish!

My favourite primer is a high-adhesion primer {means it really STICKS}
 by Zinsser


The best part is this stuff dries FAST, no waiting overnight. It is dry and ready to coat in 1 hour!
The drawback is it smells. 

Unfortunately, I ran out of that primer halfway through a project and was too lazy to drive 15 minutes to the big box hardware store. 
Since Benjamin Moore is about 5 minutes away so I have been using this:


This works really well but the drying time is at least 12 hours. Hard for this impatient girl!
The bonus is it doesn't seem to smell as long as the Zinsser primer.

Second: Paint

For most of my projects I use a satin finish paint. It is a personal preference. I would use glossy if I wanted a shiny, modern look to my furniture, but have yet to feel the urge to shine things up! Or use eggshell or flat if I wanted an old world distressed look. 

The range of most paint sheens are from flat to shiny:
matte {flat}, eggshell, satin, semi-gloss and gloss.

For the past year or so I was using Benjamin Moore's Aura paint for my furniture but after using Behr on the end table I am switching!


I found with Aura the finish didn't cure like I wanted and you could see the brush strokes/roller marks because the paint dried so darn fast.

When I painted my daughter's side table I used this:


Loved how it turned out. The satin finish wasn't as shiny as the Aura satin paint and because coverage was fantastic, you couldn't see roller marks!

I use this paint for walls:


This paint is fantastic as it is a primer-in-one paint. But I wouldn't use it on furniture without using an oil-based primer on an unknown surface, I learned the hard way over a year ago when I painted a Billy bookcase without using an oil-based primer and the paint peeled right off.
Only use this without a primer if you know you are painting over latex.

Third: Sealant

I use a sealant over top of  paint on surfaces I know will get lots of wear such as desks, dresser tops, table tops. etc.

My favourite is this:


It goes on milky but dries clear. Using a minimum of 3 coats, it dries to a nice hard finish! 


There many varieties of sealants out there, some you can spray, while others you wipe-on. I have yet to try them all.

When choosing a sealant you need to choose one that has the same sheen as your paint or comes in a sheen you want. They too range from flat to shiny.


Come back next week as I share my spray painting and painting techniques putting my tools and paint to use!


PS: Here is a fabulously funny joke my son told me while I was painting the bathroom last week:
Why was the blonde wearing a fur coat and denim jacket while painting?
Because the label on the paint can said: "For best result put on 2 coats!"


XO Barbara