Showing posts with label spray paint. Show all posts

Tuesday, September 6, 2011

Busy Painting


With school upon us, the organizational bug has hit me. After a summer of leisure, tackling my to-do list has come to the forefront. I spent last week organizing schedules, sports, school supplies, buying a dress for my daughter's upcoming grad cruise {which is a miraculous feat to find a dress for a 6 ft tall girl!}, helping my parent's pick out paint colours for their new house, work on the design scheme for my first "clients" and finally paint my fabulous Craigslist find!

The weather is warm, which makes painting a breeze. 

Here is what I started with:
{somehow I can't find my "before" photos, I know I took them...}


And here is a peek at the hardware with a coat of spray paint. Tomorrow I am going to glam up that hardware with the midas touch.


You didn't think I would show you the whole thing finished did you? 

You will just have to wait, along with my daughter who is patiently waiting for her new dresser
and newly painted walls with a fabulous wall treatment!

More to come.....

Now I am off to wait for my "baby" to come home from his first day in high school.
All three of my children are in high school, my oldest graduates this year.
Sniff.....

XO Barbara

Friday, April 1, 2011

Painting Furniture 101: Paint


Glad you came back for painting 101!

 The focus for today's post is the type of paint I use to paint furniture.

Like I mentioned in yesterday's post, the type of piece I plan on painting is what determines what type of paint I am going to use.

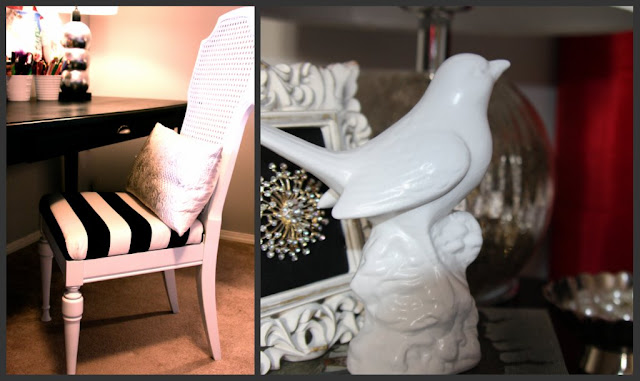
For smaller items, pieces with curves, nooks and crannies and smaller surface areas I will use spray paint.
Spray paint can be used to paint so many surfaces. 

Items I have painted are plastic garden pots, picture frames, chairs, trays, brass lamps, fireplace screens, baskets, ceramic ktochkes, lamps, etc.

I love using spray paint, it is the quickest and easiest way to transform furniture and accessories.


Since spray paint colours are limited {at least at my hardware store} I usually use spray paint if I don't need a specific exact colour, that is why a paint sprayer would be so nice! My go-to colours are usually black or white. I have used silver and bronze, but find the patina is too shiny so I "dull" the colour by rubbing black paint and wiping off to give it a more aged patina, like I used on my antique mirror. 

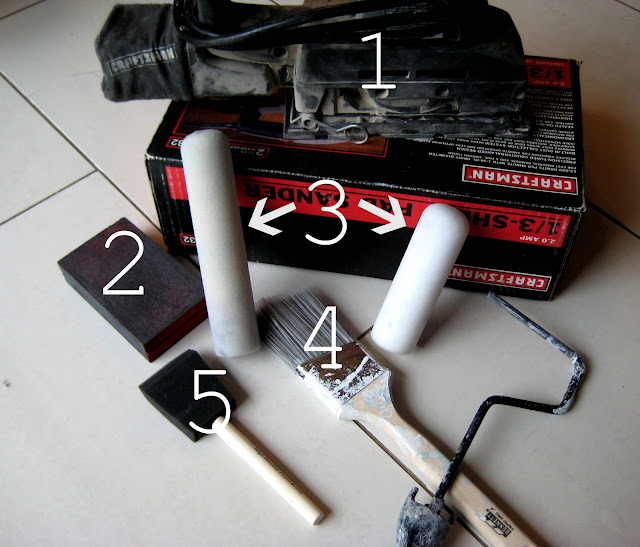
When I decide to roll on paint, here are the few types I use. 

First: Primer

I prime almost ALL surfaces. Primer is the best way to get a smooth and professional finish. It also minimizes paint wear and chipping. Most importantly it helps the paint adhere to the surface.

The type of primer I use for 90% of my projects is an oil-based primer.
The reason I use an oil-based primer is that most Craigslist or thrift store finds have an unknown finish and usually some unknown awful laquer or varnish.
A latex primer would just peel off.  

The beauty of oil-based primer is that you can use latex paint on top!
So if you know your piece was painted with oil, you can paint on the oil-based primer and then top with latex paints! Perfect solution -no need to sand away all that oil based paint or varnish!

My favourite primer is a high-adhesion primer {means it really STICKS}
 by Zinsser


The best part is this stuff dries FAST, no waiting overnight. It is dry and ready to coat in 1 hour!
The drawback is it smells. 

Unfortunately, I ran out of that primer halfway through a project and was too lazy to drive 15 minutes to the big box hardware store. 
Since Benjamin Moore is about 5 minutes away so I have been using this:


This works really well but the drying time is at least 12 hours. Hard for this impatient girl!
The bonus is it doesn't seem to smell as long as the Zinsser primer.

Second: Paint

For most of my projects I use a satin finish paint. It is a personal preference. I would use glossy if I wanted a shiny, modern look to my furniture, but have yet to feel the urge to shine things up! Or use eggshell or flat if I wanted an old world distressed look. 

The range of most paint sheens are from flat to shiny:
matte {flat}, eggshell, satin, semi-gloss and gloss.

For the past year or so I was using Benjamin Moore's Aura paint for my furniture but after using Behr on the end table I am switching!


I found with Aura the finish didn't cure like I wanted and you could see the brush strokes/roller marks because the paint dried so darn fast.

When I painted my daughter's side table I used this:


Loved how it turned out. The satin finish wasn't as shiny as the Aura satin paint and because coverage was fantastic, you couldn't see roller marks!

I use this paint for walls:


This paint is fantastic as it is a primer-in-one paint. But I wouldn't use it on furniture without using an oil-based primer on an unknown surface, I learned the hard way over a year ago when I painted a Billy bookcase without using an oil-based primer and the paint peeled right off.
Only use this without a primer if you know you are painting over latex.

Third: Sealant

I use a sealant over top of  paint on surfaces I know will get lots of wear such as desks, dresser tops, table tops. etc.

My favourite is this:


It goes on milky but dries clear. Using a minimum of 3 coats, it dries to a nice hard finish! 


There many varieties of sealants out there, some you can spray, while others you wipe-on. I have yet to try them all.

When choosing a sealant you need to choose one that has the same sheen as your paint or comes in a sheen you want. They too range from flat to shiny.


Come back next week as I share my spray painting and painting techniques putting my tools and paint to use!


PS: Here is a fabulously funny joke my son told me while I was painting the bathroom last week:
Why was the blonde wearing a fur coat and denim jacket while painting?
Because the label on the paint can said: "For best result put on 2 coats!"


XO Barbara

Thursday, March 31, 2011

Painting Furniture 101: Tools

Thanks for all your wonderful comments on the end table I painted for my daughter J's room.
In all honesty I was really stepping outside my comfort zone by painting it a colour other than black, red or white! We had fun choosing a paint colour and glad we went with our gut!


But many of you asked how I painted it...

Jen said...


I agree with all the comments above: great colour, great makeover! It's really lovely. And you got such a nice finish on it! It looks professionally sprayed. And it's great that your daughter loves it. Smart girl.

Rosa @ www.flutterflutter.ca said...


Turquoise and purple... my favourite!! Good job! Do you own a paint sprayer? Is that your secret?

 Since you asked, I'll share what I use to paint my wonderful thrift store and Craigslist finds. 
First, I determine whether I'll use spray paint or roll paint on. I do not own a paint sprayer, wish I did though! When I spray paint I use spray paint purchased at my local hardware store. I prefer to use Rustoleum brands of spray paint. 

I do find their paint colour and sheen varieties limited, therefore I only use it on furniture and items that don't have a lot of surface area or have curvy and wavy surface areas, such as a lamp, chair or frame and  when I want to use a basic colour such a white or black.
I will get into more detail about the different spray paints in an upcoming post.


For large pieces of furniture with large surface areas I roll on paint. In order to get a smooth finish, you need to use the right tools. 
Here are the basic tools I use:

1 and 2: I sand most pieces before I start to paint, especially if they are going to get a lot of wear, such as a desk. This ensures a smooth surface and adhesion of the paint. If the piece has dings or the finish is chipped I whip out my lovely sander {1}I stole borrowed from my dad to smooth and prep the surface. Less damaged items I scuff the surface with my {2} trusty sanding block. 


3: For a nice smooth finish I use foam rollers, I have 2 sizes based on the size of the surface area I wish to paint. 
4. I use a paint brush for cutting into edges or  into places the roller doesn't cover. The key is to buy a really good quality brush. Don't cheap out on your tools, they make a huge difference in the final look.


5. I use a foam brush when I am painting with oil based paints, I just throw it out when I am done, eliminating clean-up. I also use a foam brush when I paint with verathane.


Let me emphasize the importance of not buying cheap paintbrushes and rollers, invest in good quality, with care they will last you a long time.


 They are the key to achieving a smooth and gorgeous paint finish and to eliminate any heartache along the way!


 Here is my "behind the scenes" photo. Our furry friend, Henry was curious and decided to "help."


Isn't he so cute?


Come back tomorrow when I share how I put those tools to use - my painting techniques and tips!
XO Barbara

Wednesday, November 3, 2010

~Thrifty Find~


Re-designing our 16 year old girl's room on a budget has been so enjoyable. Instead of running out to various home good stores to buy eveything ready-made I have sourced a few accessories for her room from the thrift store. 

It seems that thrift stores here on the west have caught onto us bloggers and their prices reflect that {grrr..}, 
despite that I have managed to find some diamonds in the rough.


I spotted this ceramic bird in all it's shiny glazed glory,  


Using a little white spray paint ...


  it becomes a chic accessory for her bedside table.

Last week I discovered a small local thrift shop where I found this beautiful metallic dish, perfect for storing her jewellry and hair ties she removes at bedtime.


Now I can't wait to replace her wobbly bedside table.

 I visited Ikea on Friday and bought this to hack {I am hoping to work on that today}:


BUT:
They were out of this:

source: Ikea

They told me to check back in a few weeks as they are undergoing renos and have put ordering fabric on hold -hmph! 

Guess the drapes will wait. I did buy some other fabric to replace her hideous venetian mini blinds - my plan is to make a roman blind!


The projects never end around here but I am having FUN!


Thursday, June 3, 2010

~A Mirror Transformed~


My daughter's bedroom is finally coming together, I am just adding the finishing touches and a few more furnishings. 

When she came home from her hiking trip she was thrilled with the Stonington Gray on the walls.


 Her words (and my other daughter's words as well) "It looks so grown up!"

 Just the mood I was trying to convey with the colour choice. Glad to have a satisfied client. 

 The furniture is back in, her "collectables" have been edited, new bedding purchased, art hung and I have re-vamped a few thrift store finds. One is this ornate mirror I found at a recent thrift store jaunt, each for $5. I bought two, one for each girl. This mirror will help bring a bit of glam to the room.


This is where spray paint comes to the rescue. 

First I spray primed the mirror frames with spray on primer, then I sprayed them white. 


I didn't like the white frame against the gray, it was too stark.
Spraying the mirror with a bit of black allows it to really pop against the gray walls and now coordinates well with all the other frames on the art wall above her bed. 


{no matter how I tweak the photo, the camera doesn't capture the wall colour}

We are still choosing some photos from her massive collection of photos (teenage girls take a LOT of photos) to place in a few frames.

But here is a sneak peek: 


You can see the peony painting I painted early on in the year.

All that is left is to source out a nightstand and make the headboard, which I will need my husband's help with the jigsaw if I want to keep all my fingers!

SNS @ Funky Junk Interiors


Monday, May 24, 2010

~Kitchen Chairs Get Classy~

*Edited: August 21, I am linking up to Nester's impromptu "chair party"


As I mentioned in my previous post, I have been a busy bee this past week. After re-painting Georgia's chair with spray paint and a monogram I was eyeing something else to paint.

 Our kitchen chairs were my next victims. 

I loathe those chairs. 

We bought them a long time ago and two have already met their fate. One fell apart over the winter, you can read about it here. I still haven't bought new chairs; partly indecision, procrastination and not wanting to spend a lot. I really want some modern chairs, I think they would go wonderfully with my old antique library desk that serves as our kitchen table.


{These are the type chairs I really want}

In the meantime, why not spray paint the chairs? 

Here they are before, in all their pale oak glory {along with my UGLY 90's oak kitchen that I can't spruce up because I am renting}


After 6 cans of spray paint, running to Home Depot to get more, dodging rain drops, breathing in fumes and keeping my dog away from the wet paint they are finally finished!


I think they look amazing. 


{I love our old table, it was our first furniture purchase when we got married almost 19 years ago, it was painted with layers of bright red and blue and then green, that we my husband lovingly stripped and sealed.}


My 14 year old daughter asked why hadn't I done this sooner, they look so much better.

 I have to agree. 

Linking to:


Thursday, May 13, 2010

~Georgia's Chair~


 When my niece comes over she always requests "Georgia's chair" to sit on while eating her snack of crackers that are given to her surreptitiously by her Auntie Barbara ( shhh....don't tell my sister). The chair is a booster chair that we purchased from Ikea about 11 years ago when my son decided that he was Houdini and would slip out of his high chair to sit on a "big" chair. I stumbled across this mini chair at Ikea and for only $19.99, it made its way into our home. It was used by him as a booster chair then desk chair until recently when I realized that being almost 12, uhmm... he is a bit too big. (Hard to realize the baby is growing up) 

Last week armed with spray paint I decided to give the chair a face lift. Using a can of black semi-gloss Rustoleum paint I gave the chair the lift it needed. After seeing monogrammed pillows, dressers and chairs with numbers all over blog land and in magazines, I decided to monogram the chair with a "G". My niece, Georgia, who I think is very bright for a 2 1/2 year old,  loves to point out letters and say words associated with that letter, such as G for Georgia.

 How perfect! 


Now she has her very own chair with a G. It also helps that her sister, who is only 6 months, is named Gabriella and can use the chair when she is old enough.

Before:


After:


The how-to:

1. First you choose the desired font and enlarge it. I chose Modern No. 20 and enlarged it to 600.
2. Next you print it out.


3. Cut it out and place on chair in desired location.


4. Using a pencil outline the letter pressing down in order to leave an imprint on the chair.


5. Outline the imprint with pencil.


6. Using acrylic paints and a rounded and square tip paint brush, fill in the outline. I had to paint several coats to get the depth I wanted.


7. Seal seat with a satin varnish, a step I still need to do. My varethane dried out so I need to buy some wipe-on poly.


Now I need to have my sister over for lunch so Georgia can sit on her chair!


Linking to: