Wednesday, December 30, 2009

Creating a Beautiful Rental Home: Tip 1 ~


I love to read decor magazines and blogs. They are so full of inspiring ideas yet there are times I feel a pang of envy. We don't own our current home and are renting until we find the right home for our budget. We have moved 5 times, twice across the continent from one coast to another and between countries. We have rented more homes than we have owned due to our moving every few years. 


Over the years I have learned that even though I can't knock out walls, renovate a kitchen, tear our carpet I can still create a beautiful home within the constraints of renting. I must admit that I can't wait until I can tear up, knock down and redo a house to my liking. In the meantime I am trying to be content with our lot in life and do the best I can. Sometimes being restricted in what you can do to a home can really bring out the creativity. Over the years I have learned a thing or two and would like to share my ideas. (I wish my photos of past homes were digital, I could then show you what I have done in past homes)


I have decided to create a mini-series of some do's and don'ts in creating a design saavy home while renting. Stay tuned over the next week as I share what I have learned over the years.


TIP #1
Don't hesitate in painting the walls. Just because you are renting doesn't mean you can't invest a little. Paint doesn't cost a lot and you get great results. Don't forget it is the home you live in, even though it is temporary you need to make it your own. But make sure you have the OK from the landlords (or you can paint the colours to your liking and then paint back before you move) Another idea is if the walls are white you can add punches of colour in your accessories, art work and drapery. I will be discussing those topics in the next few posts. Stay tuned!


Before -  ugly paint colour and light fixture in the living/dining room....


....after!


Family room in all it's peachy glory...


...after with a fresh coat of paint.


Master bedroom - more peach....


...after with a lovely shade of grey-blue.


Don't be afraid to roll up those sleeves, grab a can of paint in a colour you love and create a room you will enjoy to be in.


Linking up with Kimba's DIY Day at A Soft Place to Land
and *edited: January 7 Transformation Thursday at The Shabby Chic Cottage

Thursday, December 24, 2009

Merry Christmas~

Wishing everyone a Merry Christmas....


from our home to yours!

Wednesday, December 23, 2009

My Version of Eddie Ross' Wreath~


I jumped on the Eddie-Ross-ball-ornament-wreath bandwagon. 
I thought this would be a frugal DIY but it ended up costing me $20 for all the glass balls.

Words from the wise: use shatterproof ball ornaments. 


Needless to say I love how it turned out. It is now hanging from my entrance way mirror. The mirror was an old frame my mom found in Prague and was a gaudy gold. I spray painted it silver and "tarnished" it with some watered down black craft paint. 


Saturday, December 19, 2009

Coffee and a New Magazine in the Mail!


I am a self-professed magazine junkie.


I love magazines of the home decor type. I am sure I have sympathizers out there, or am I the only one that stands at the checkout eyeing the latest while trying really hard to resist buying another? The same now goes for blogs. There are so many amazing blogs out there, ordinary (yet very talented) women to professional designers blogging about their latest projects and trends. 


I finally had some time early this morning after the rest of the family hopped into the car to go skiing. I declared I needed to catch up on Christmas baking (but secretly I wanted some quiet time to read the latest issue of my favourite magazine that came in the mail 2 days ago) 


Let me introduce you to Canadian House and Home.


I drooled this morning, being careful not to drool into my cup of java, while pouring over the newest issue. So many amazing trends and ideas that many of you talented bloggers are using in your homes. A sneak peek at what's inside:


A DIY chair makeover - Canadian House and Home magazine: Jan 2010


This magazine has been my inspiration for years. It was my bit of Canadiana that came in the mail while I lived in the US. I looked forward to the bit of "home" that came monthly. My wonderful mother-in-law (she reads my blog) gives each child (that includes us wonderful in-laws) a magazine subscription of choice for our birthdays. This one is mine! Now I get a present every month - one that gets the creative juices flowing and the idea file growing!


Friday, December 18, 2009

~Dressed up Fireplace Mantle~

I love fresh greenery around the house at Christmas, especially on the fireplace mantle. All I did was clip cedar and spruce boughs from the trees out front and lay them along the mantle. 


Cheap yet beautiful. 


Throw in a few Nutcrackers, candles and faux red berry garland, hand made stockings, candles from Ikea and dollar store candle holders and you've got a dressed up fireplace ready for Christmas! 


I made these stockings about 15 years ago  still love the embossed velvet on the cuff, each person has a different "edge" on their cuff.


Linking up to one of my favourite blogs: 

Thursday, December 17, 2009

~Easy DIY Wreath~

This year I decided to make my own fresh wreath.
I found a spare wire coat hanger, shaped it into a circle, clipped foliage from the trees in the yard and secured them to the hanger with florists wire. 


Total cost: FREE


A little droopy,
but this gal didn't pay a cent!


This wreath is joining the Linky Party at:
Frugal Friday: Holiday Edition  at the The Shabby Nest

**edited December 21: joining Make it for Monday at Cottage Instincts

Wednesday, December 16, 2009

~Custom Look-Bargain Basement Price~


Want to get the look of a custom frame job without paying for it? 
Pick up a frame from Ikea or Target and get a custom mat cut. 
My local art supply shop makes custom mat cuts for next to nothing. I had a black and white print of Prague that I wanted in a large frame with a lot of white space. I measured and had them make an off-center window. 
I love how it turned out. This is going in the dining room for now but after the holidays when the fireplace mantle is cleared of foliage I will prop it up there. 


Cost: $19.99 frame, $12.00 for the mat and the print was free!


This print is going to visit:
Show and Tell Wednesday at Blue Cricket Designs

Friday, December 11, 2009

~Christmas Around The House~


Let the festivities begin!


The decorations are finally up -  red and silver with a little bit of homemade sprinkled in.


free foliage from the yard + Nutcrackers + faux berry garland = holiday ready mantle


A little homemade love...

bling and a wreath on the light fixture....

 Czech nativity...

oh-yes that is a bicycle in the photo - like I said here - my hubby adds his touches around the house.


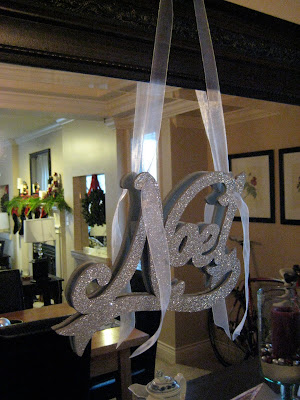
Joyeux Noel!


My home is going to visit:

Tuesday, December 8, 2009

~Gingerbread Houses~


The elves have been busy at our house. 


This weekend my kids and I made our traditional gingerbread houses. They really look forward to this time, it is our official kick-off to the holiday season. After we go and pick out the perfect tree. I think the kids like decorating their houses because they are given the freedom to eat tons of candy! 
Can you guess which one is my son's? He doesn't follow the status quo but definitely marches to the beat of his own drum!


 The tried and true recipe is from Martha, you can get it here.


We even made stained glass windows with crushed Lifesavers!


YUM!
(Now the challenge is to keep the dog away from these!)


These houses are going to join the Linky Party at
DIY Day at a A Soft Place to Land
edited Dec 16th: off to Transformation Thursday at the Shabby Chic Cottage
edited December 21: Make it for Monday at Cottage Instincts

Monday, December 7, 2009

~Desks for the Girls: Part II~

I have been on the prowl for some desks for my 2 teenaged daughters. It must be that hunter-gatherer instinct coming through. I don't want to spend a lot of cash yet would like a good piece of furniture. My dilemma is that I also have daughters with particular tastes. This has proven to be a bit of a challenge. 


I hit the jackpot for the 13 year old when I came across this beauty, a custom made desk on Craigslist, which I bartered down to $60!


Before
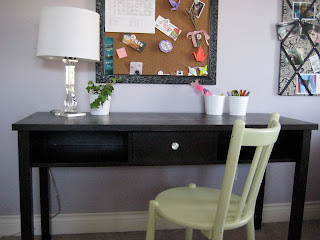
The monsoon rain that has soaked us here on the "wet" coast finally stopped and I was able to get some painting done. The bonus was the hubby was away on business so I could spread the DIY projects all over the house without hearing any complaints! I sanded, primed and painted several coats of Black Beauty from Benjamin Moore from their Aura paint line. My skeptical family was worried - the paint when first applied looks purple - but it ended drying to a beautiful shade of black. I changed out the "blah" handle with a little bling. My cost: $60 desk, $18 paint, $5 crystal knob - $83 loonies (that is Canadian speak for dollars)


Ta-da!


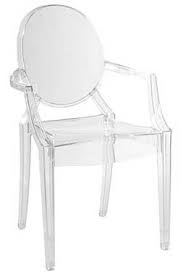
 All the desk needs is a funky chair. My dream would be one like this:


Louis Starck Ghost chair 


or this  classic Bergere chair:


Wouldn't she look beautiful upholstered in this?


or this?