Showing posts with label Christmas. Show all posts

Thursday, December 23, 2010

{merry christmas}

My posts will be sporadic over the Christmas break, I will be enjoying much needed family time. We have a fun filled break, enjoying Christmas Eve with my sister and family, then an open house party for the neighbourhood at our home next week, tickets to see the Nutcracker ballet with the kids, maybe some skiing at Whistler and just some R&R! 


I would like to wish everyone a wonderful Christmas from our family to yours!

 I have been overwhelmed by the all the support and followers of my humble blog, which I started to document how I turned a ho-hum rental house into a warm and inviting home for my family using my imagination and ingenuity. Thanks for all your support!

Merry Christmas!

Monday, December 20, 2010

{czech nativity}

Thank-you 
to everyone who left such flattering comments on my {holiday home tour 2010} post! They gave me such joy!


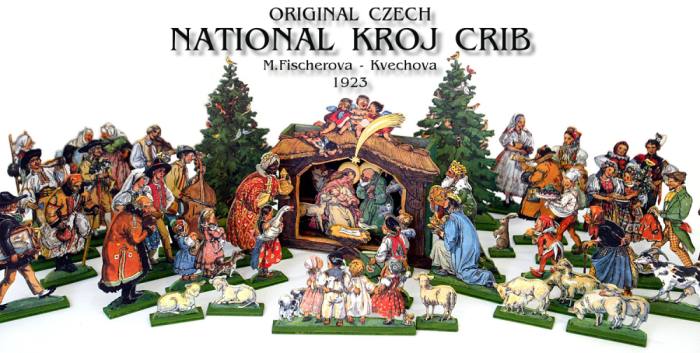
 Many of you admired my paper Czech nativity, wondering where I got it from. Since there was an overwhelming interest I thought I'd write a post about it AND I wanted to give one of favourite bloggers, Dana from Bungalow 56 some joy. She admired my nativity so I am linking up to her "Finding Joy" link party.


 Here is a bit of family history behind that nativity. My parents have the same nativity,  which they displayed every year at Christmas time. So beautifully illustrated {designed in 1923}, this version of the nativity has been part of Christmas since I was little that I was thrilled when my dad bought it for my sister and I on one of their trips to Prague. It came on a large sheet of card stock which you painstackingly cut out each figurine. The nativity is designed to be  displayed with each figurine taped to a platform, but I decided to glue a bamboo skewer to the back of each character and then poke the skewer into a batting covered foam. 


The figurines in the nativity are all representatives of typical villagers in a Czech village wearing traditional Czech dress, each bearing a gift to the Christ child, something they specialize in, for example, a musician is playing a violin, a baker is bringing bread, and we can't forget the neighbourhood pub owner who is even bringing a pint of beer {the Czechs like their beer}. As a child I loved to stare at the scene and make up stories in my head about each figurine. I love how beautifully illustrated each piece is, with so much detail.

What I am thrilled to share with each of you is that after a quick internet search you can download and create your own nativity!

All you need is some really good card stock and a great colour printer.


To download and print one just like mine you can find it here.

The fun doesn't stop here, I found another web site that has a plethora of more traditional Czech nativities that you can download and put together. 
The website is called the "Crechemania Store", it is full of free and for purchase creche downloads such as this one
You can even print ornaments, fold out nativities, and little houses to create a village.


Merry Christmas,
Barbara

Wednesday, December 15, 2010

{holiday home tour 2010}

Welcome! 

We are all dressed up for the holidays!


 Come on in.....


 Our living room....


{Living room reflection from dining room mirror}

{even comes with a lovely blue exercise ball :)}

 Christmas vignettes...


Handmade green and red embossed velvet stockings...


Moving on to the dining room...


 Getting cozy in the family room...


 Traditional Czech nativity {cut from paper}...


Our Christmas tree..


 Gingerbread houses....


Hope you enjoyed my tour, come back and visit again!


XO Barbara

Saturday, December 11, 2010

{sew simple: christmas tree skirt}

My goal this year was to decorate the house for the holidays using just what I had. With that in mind I made this tree skirt using {mostly} what I had!

 My husband and I are coming up onto our 20th anniversary and we have never had a tree skirt. It has always been something I have wanted to make but never got around to it. 

Finally this year, wanting to join in Centsational Girl's Craft Linky Party, I got my act together and made a tree skirt. 


While cleaning out my closet I unearthed a bolt of red chenille fabric. It was the perfect fabric for my tree skirt. The only thing I purchased was lining, which was on sale, cost me $5 for 2 meters! After rummaging in my notions bin I found the exact length of satin ric rac to edge the skirt and white grosgrain ribbon for ties. 

Perfect!

Supplies needed:

1.5 m fabric of your choice
1.5 m matching lining {or contrasting fabric will work as well}
thread
ribbon for ties, 8 pieces cut into 50cm lengths
ric rac, about 4.75 m
piece of chalk
string

How-to:

1. Lay out your fabric on a flat surface. Tie a length of string around the piece of chalk for a make-shift compass {yes, geometry is involved in this sewing project}. Find the center of the width of the fabric and hold the end of the string without the chalk down with one hand while drawing a circle with the other. {Hope that makes sense?} 

Cut out the circle.


2. Using a bowl, trace out a circle in the center of the large circle. This is needed to allow for the skirt to go around the tree trunk.


3. Using a right angled ruler draw a line for the opening of the skirt. Cut the slip and the center circle making sure to allow for seam allowances in the center circle {see photo in step 4}.


4. Lay the skirt onto the lining, pin in place and cut out lining using your tree skirt fabric as a pattern.


5. Pin ric rac or whatever edging you choose along the seam line {about 5/8 inch from the edge}. Pin facing inwards away from the raw edge.


6. Stitch the ric rac, the stitching line will be your guide when you sew your lining to the fabric.
{oops, no photo}

7. Pin ribbon evenly along the 2 opening edges, making sure they match up.


8. Pin the lining to the right side of the fabric. Sew along the edge using your stitching line from the ric rac as your guide. Leave an opening about 5 inches wide to allow you to turn the skirt right side out.


9. Clip the curved edges. Turn the skirt right side out.


10. Press edges.


10. Pin and slip stitch the opening closed.


11. Place under the tree and cover with gifts.


{horrible grainy photos, hard to take photos when the skies are always gray}

Have a wonderful weekend:)


XO Barbara

Thursday, December 9, 2010

{dear santa}

Dear Santa,

My wish list for 2010:

1. A fantastic pair of equestrian style boots.


2. A wide angle camera lens {to hopefully take better pictures}.
but I also need to figure out how to use our Canon SLR!


3. A Parson's desk from West Elm.
{how about a West Elm in Western Canada?}

4. A fabulous piece of art.

"Into"

{by Michelle Morelan, hometown designer, artist and blogger}


5. A coat tree rack for our foyer.

{Saw this, liked it, but can't find it anywhere}


6. Domino: The Book of Decorating book

 {I know I am soo late in the game, love it, want it}


7. A gorgeous tufted sofa


{A girl has to look good even though she is a mom of 3 and hit a milestone birthday}


9. A trip to Europe with my family.

{to visit family}


10. And to finally find a home to call our own.


What's on your wish list?


XO  Barbara