Showing posts with label Ikea. Show all posts

Tuesday, October 18, 2011

IDS West Re-Cap and Blend 2011


A year after having a conversation over lunch with Nancy, Karla and Victoria, our dream of having a blogger soiree during the IDS West show became a reality! It all came together beautifully, with Ikea Canada jumping on board and paying for the whole thing - yes - food, drinks, the venue, swag bag goodies AND offered up a $1000 gift card too!

The ladies at Ikea Canada as absolutely fabulous, not only are they incredibly talented and passionate but so kind. I am thrilled to be able to work with them again in the future.

Another fabulous sponsor was Delta Faucets, they helped with our incidental costs and donating fabulous door prizes too; decor books and faucets.

My weekend started with the IDS West Opening Night party, where we were given a sneak peek of the whole show, yummy canapes and wine. I received a VIP invite to the Jenn-Air booth as well, their appliances are so impressive!


On Saturday evening, after all our hard work, our blogger soiree we called Blend 2011 came to life! We held it at The Loden Hotel, a fabulous boutique hotel downtown Vancouver. The food was amazing and the company equally superb!


The Designer Guild pillow from The Cross came home with me!

 Zoe Pawlak and Jen Knight {PR Ikea Coquitlam}


 Carol, The Design Pages and Michelle, I Dream of Chairs


 Myself, Nancy, Suzanne Dimma, Karla and Victoria


Suzanne Dimma and Mark Challen


Not only did Ikea Canada sponsor the whole event but they brought famous guests with them as well. Suzanne Dimma, editor-in-chief for Canadian House and Home, Mark Challen, VP of Communications {also a fabulous designer} and Kelly Deck from Kelly Deck Designs, our local HGTV star and the next "Sarah Richardson" of design!

I was star struck, wanted to pick their brains but with all that was going on, I managed to just thank them for coming and get my photos taken!


Mark Challen


Kelly Deck


The Prizes

That evening, the party continued up in our suite! Yes, we had a suite at the hotel, we grabbed platters and my favourite girls from Birch & Bird went and got more wine! We stayed up until 2:30 AM chatting non-stop.

In the morning, a few of us met for brunch at the Fairmont Pacific Rim, yum!


I so enjoyed meeting bloggers face to face and rubbing shoulders with Canadian designers!

We are looking forward to planning out next event, which we hope will be bigger and better!

If you are a design or lifestyle blogger from Canada's West, why don't you join us?
Send me an email and I can connect you to our network or you can follow our blog!

XO Barbara


Photos:
1, 2, 18 : Sheila Zeller
4, 6-11: Sari McNamee
3, 5, 15-17: Darryl Bueckert


Friday, September 30, 2011

A Fabulous Rast Hack


Hello and good morning.

Last night was so exciting and fabulous. I will tell you all about it next week!

On another note, my "baby" girl turned 17 yesterday. She isn't much of a baby anymore, she graduates this year and at 6 feet tall she is so stunningly beautiful. 

We have also starting the process of university selection and scholarship applications, so daunting and exciting at the same time!

But.....

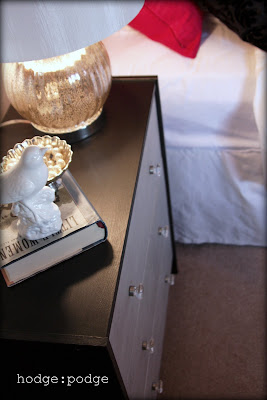
today I bring you an Ikea Rast hack that a reader emailed to me. 

Jacob, who should have a blog, sent me these photos of a Rast hack he made inspired by Miss Mustard Seed's Union Jack dresser!

This is his version! You would never know that they started out as a plain Rast dresser!


Thanks for sharing Jacob!

XO Barbara

If you have a Rast hack that you want featured here, I would LOVE to write a post about it. There is nothing like a good Rast hack!

Tuesday, May 31, 2011

How-to Make Striped Drapes Using Ikea Drapery Panels


One sewing project I have been slaving over working on and finally completed was sprucing up some plain store bought drapery panels. My daughter wanted striped drapes, we searched for wide-striped fabric but after the calculating yardage, price and work involved we made these instead.


All that was required was this:


And some contrasting fabric:


Here is the how-to:

You need:

  • Store bought drapery panels {I used Ritva drapes from Ikea for $39.99, I liked the weight and the header on these drapes}
  • Fabric for stripes, your choice, but choose a fabric with a similar weight and weave as the drapes, I used 3 meters, it will vary, depending on how wide and how many stripes you would want
  • Long ruler
  • Chalk
  • thread to match the fabric {or you can use contrasting thread to add some interest}
  • Hand sewing needle
  • Pins
  • Sewing Machine
  • Iron

*You could use fusible webbing if you didn't feel like sewing. 
*Another option: You could line the drapes to really give them a custom look, but I chose not to.


How to:

Hem the drapes following the directions on the package.

First determine how wide you want your stripes and how many would be needed on your drapery panel. My finished length was 86". I chose 7"wide stripes and determined I needed to cut 6 for each panel. 


 Lay out your fabric and measure strips 1" wider and 2" longer that your desired width and length. This is to allow for hems.

My drapes were 57" wide and I wanted 7" high stripes. Using chalk, I measured out 12 - 8" X 59" strips.
Using a quilting square or a dressmaker right angle ruler works well to get even strips.


Cut out strips and iron a half inch hem on one side running the length of the strip.


Then iron a half inch hem on the opposite side, using a measuring tape to ensure the strip is 7"wide after the edges are ironed. Leave the ends un-hemmed.


Start pinning down the strips. I determined my strips would begin 4"from the top, that way I ended up with even spaces of black and white down to the bottom hem.


 Continue this down the drape, spacing 7" between the strips. Leave the edges overhanging.


Topstitch the edges of the strips with your sewing machine, leaving the ends free.


Iron the edges over to the back and pin.


Slip stitch the edge hems. Press edges with iron.


Hang up!


Now I am working on sewing working Roman blinds for all three kids' rooms. The sewing part has been easy, but I am having a hard time finding parts in the right widths. I can't find wooden dowels {these help the folds} wider than 48" without having custom cut dowels from the fabric store. That brings up the price dramatically. 

I need 57" wide, anyone have any tips?

{No, I don't like Little Green Notebook's way of making Roman blinds}

XO Barbara

Friday, April 1, 2011

I'm Featured: Ikea Hackers


Check it out along with other amazing Ikea hacks!

XO Barbara

PS: Come back Sunday as I feature my first famous Canadian designer!

Thursday, March 17, 2011

{more ikea rast hacks via ikea}


I couldn't resist. 

A Baby a Dog and a Blog sent me a link to some Ikea Rast hacks that came via Ikea's blog, Livet Hemma.

The blog is full of great photos and I think great posts, that is, if you can read Swedish.


Don't you just want to run out and buy a few? 

XO Barbara