Monday, November 30, 2009

~Check This Out~

*if you are my sister and are reading this post then go no further - Christmas secret!


    One of my favourite blogs to read is by the dynamic duo Aubrey+Lindsay. They blog about their adventures of decorating their first home in Toronto. I love their style and DIY spirit, not to mention that they are also Canadian! Check them out, maybe they will become a favourite too.


     Lindsay also runs a wonderful letterpress business called Penny People Designs. I love her assortment of cards, invites, stationary and  art. My all time favourite is the wonderful alphabet art you can have personalized. This art has a great vintage feel to it and would look fantastic in a child's room. My kids are too old for that so I ordered one today from Lindsay's etsy shop for my nieces for Christmas. I can't wait until it comes! All I need to get is a frame from Ikea - that is where I am heading tomorrow to pick up a frame for a large map that is going onto my son's wall. I am hoping to have his room mostly put together and to share photos later this week!


Wednesday, November 25, 2009

~Keep Calm and Carry On~

Yesterday I found my husband printing up a card. I was curious as to what he was printing and I found him printing this:


Image from http://www.keepcalmandcarryon.com


I wanted to get a poster sized print to frame and hang this up in our family room (since I love red). Sometimes my decorating challenged husband surprises me. His idea of decorating is to artfully place his socks on the floor, stack papers on the front console table or store bikes in the bedroom. He loves the idea of decorating with posters and maps, therefore after reading this article in the New York Times online on Tuesday, he wanted the famous British WWII propaganda poster for his office. He explored further and found these tongue-in-cheek posters too:


Image from http://www.threadless.com


Image from http://www.doobybrain.com
I think I want these ones hung up too - they would make great conversation starters!

Monday, November 23, 2009

~Red Chair~


I have a love affair with red.


 I love bits of red all over the house. I think my love of red goes back to the day when I had colouring projects at school and I loved to use my Poppy Red pencil crayon whenever I could.  I think most Canadians know what I mean - we have a brand of pencil crayons called Laurentian (named after the St. Lawrence River - I think?) that was in almost every child's desk. The Poppy Red name comes from the colour of the poppies we Canadians wear on our lapels before and during Remembrance Day. You can read about that here.  So now I pop in red whenever I can. 

I am S-L-O-W-L-Y  re-doing my son's room.


I love the vintage, Ralph Laureny look for a boys room with red accents. Most of the furniture has been re-painted. If you want to see a glimpse you can check it out hereOne small painting project was to paint a chair I found on Craigslist for cheap. I wanted to paint it red - so off to my favourite paint store - Benjamin Moore!  They know me quite well, so they have given me a great discount! Can't complain about that! I chose a beautiful red, Caliente, from their new Aura line (paint and primer in one!) You can check out another project I did in my son's room using Caliente here.


~before~


~after~
 I absolutely love how it turned out!


This project is going to join the many other inspiration projects at:
Metamorphosis Monday at  Between Naps on the Porch
and visiting Kimba at DIY Day at A Soft Place to Land

Friday, November 20, 2009

Livingroom : Same room with Different looks !

I am amazed at how different color schemes and room accents can transform any room ! Even with the same basic furniture, a living room can speak of different personalities and influences. The set of pictures I am putting up today shows how a simple living room with existing furniture consisting of three seater sofa and a modern coffee table and lamp, can be transformed to look elegant, stylish, bohemian, shabby chic, contemporary etc.

These pictures are bound to inspire you and the combination of colors are stunning to say the least. Look closely and you might just be able to create your perfect design for a living room.


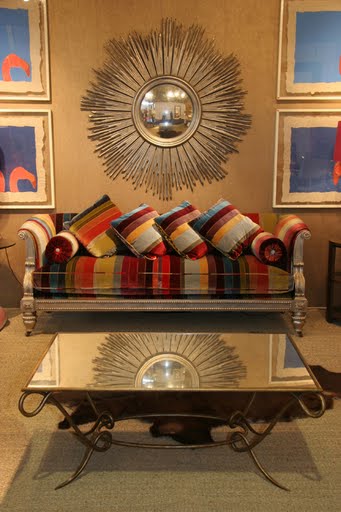
The Romantic Elegant

This setting is uber stylish, lush and romantic. The beautiful shade just brightens up the room with blood red as the focal color the whole setting is just sparkling and eclectic in its feel.

I love the beveled mirror and the fab rug !!


The Kitschy Dynamic

If you love dynamic then this is just that !! The pattern, vibrancy and truly eclectic combination of colors gives the room a real edge. The atmosphere is so cheery and the selection of artifacts is truly unique. Each and every corner has its own story to tell.

This room is not for the ordinary and it speaks volumes about style and personality !


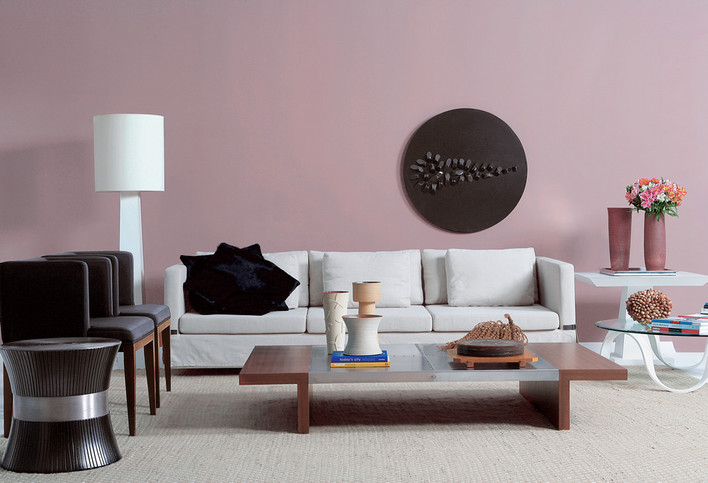
The Pure and Meditative

You love the look of white ! The color is sleek as well as sophisticated and with just the right amount of creativity and interesting mix of pieces the whole look can be awe inspiring. The room is in some ways pure and meditative with the monochromatic scheme weaving magic here !

The mannequin and the little pig in white are such interesting focal pieces !


The Casual Contemporary

This casual contemporary and totally modern take on the living room is fantastic ! The laid back and easy going attitude is easily showcased, and very carefully created by an interesting mix of medium. We have here blown up art and black ceramic vases with unique wooden art thrown it too. The color orange is known as a color for joy and conveys sociability and confidence.

The sheer riot of colors in this room makes it one of my favourite here !
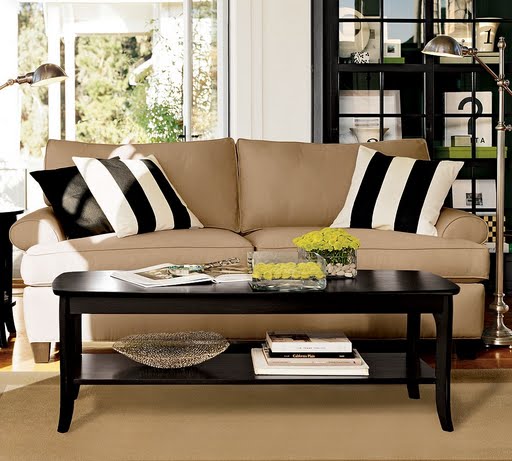


The Classic Elegant

This look is just so different from the one above that its difficult to imagine that the existing furniture are the same. The whole look is elegant and almost bordering on formal. The clean lines and classic furniture give the room a modern and sharp look.

The wooden coffee table balances the black and white furniture perfectly to make it harmonious.


The Vibrant Whimsical

The color scheme here is that of black and white but with teal blue in the background. Teal is by far one of the most vibrant colors..and makes for some very uncommon but beautiful combination. The black and white echoed in the frames, rug and cushion adds to the vibrancy to the room and adds to the visual appeal !

The arrangement of frames on the wall is so curious and add a certain whimsy to the whole room !


Wednesday, November 18, 2009

~Master Bedroom Makeover~

Living in a rental you need to be creative in your decorating. You want to spend the least amount of cash. I know many of you out there are frugalistas -so you know what I mean.

This house was stuck in the 90's with peach everywhere! The walls were screaming, begging to be painted. What is a girl to do but to painted the peach out of our master bedroom.  I chose a beautiful soothing gray-blue called Gray Whisp from Benjamin Moore. Living on the west coast where it rains alot my husband was skeptical but I love it! It is a soothing calming colour that just works wonderfully with the cream bedding and the  mostly white furniture. Every time I walk the colour makes me smile.

The armchair was an ugly 70's armchair from my childhood, you can seen more details here. I usually like dark colours but chose the light coloured dressers from Ikea (I would love some custom ones - one day). The bed frame was an Ikea as-is find for only $100 which I have had for about 6 years.  My dream is to have an upholstered headboard but can't justify that right now. Maybe I can slipcover it somehow, hmm...

~before~

~after~


~this is what our room really looks like - my hubby is a bit bike obsessed - bikes everywhere~

~I do love this print though - the Tour de France in the 20's~

The prints are family photos and a poster in frames from Ikea, Target and a yard sale. Above the bed are photos a friend took of my husband and I when we were still in college. I am looking for more prints to hang up. I have been inspired by the bare branches of the trees against the gray sky. One day when it stops raining I want to play with the camera.

The curtains were 4 panels from Linens and Things. They worked beautifully in my old house in Virginia where you have long rectangular colonial style windows. They needed to fit this wide arched window so I sewed them together, lined them and made pinch pleats. Now they look custom! I am going to show how I made them in a future post. Stay tuned...

The throw pillows are Victoria Hagen from Target in the clearance bin for $5! The lumbar pillow from Homegoods for $15. The bedding I made from sheets my mom gave to me for Christmas one year. Love the crumpled look. I used what I had and a can of paint!

Linking up to some of my favourite blogs:
 Transformation Thursday at The Shabby Chic Cottage
and to Frugal Friday at The Shabby Nest
and to Between Naps on the Porch Metamorphosis Monday
and DIY Day at A Soft Place to Land

Tuesday, November 17, 2009

~Finally Finished!~

If you read my previous post, you would of read that what should of been a simple Martha-inspired project ended up stressing me out! Well, I am pleased to announce I am finally finished! I used what I had around the house except I bought a can of Rustoleum's Painter's Touch Heirloom White spray paint. 


~before~


~Rustoleum Painter's Touch in Heirloom White~


~painted small squares using chalkboard paint~


~painted a frame around the chalkboard square~


~finally finished~


Now I need to have a few days free and no rain to finish painting the furniture in my girls' rooms!


Linking up to some of my favourite blogs: DIY Day at A Soft Place To Land
and The Shabby Nest
and Metamorphosis Monday at Between Naps on the Porch


Monday, November 16, 2009

Sofa Covers and Cushions : Designs and combinations !!

I am have been looking for some inspiration for dressing up my sofa in some lovely colors and uplifting the mood of the entire room :) And what an amazing collection of pictures I have to share with all of you !! Sofa and love seats in neutral are simple and easy options but if you really need to add that extra oomph to your room decor and make is really appealing look no further.


Sofa covers in themselves are not enough, combine some amazing mix of cushions in lovely colors and tones and you will have a winner ! Interestingly its not just the Sofa cover and cushions but also the carpet or rug that makes the complete combination. Take a look at each of these pictures and see for yourself how each of them add to the complete look :)


So lets get into discussing these lovely designs and colors, get inspired to create your own rooms and design the best for yourself !!


Sofa Covers : Combination and Designs


I Love this for the sheer simplicity !! Ivory white and green and a lot of light streaming in, what a lovely ambiance it creates. The rug is so amazing...with the weaving and knots. Add to it the wall hanging and the cushions with plants and leaf motifs in the same color. Totally Fab !!


Combination : Ivory white + Yellow green


Pink and Yellow is not a usual combination, but in pastel shades they just left me asking for more ! This design will transform any livingroom, The sofa cover in pale pink is so gorgeous with the whole set of cushions in various colors inspired by the carpet and wall hanging.

This living room echos of a set of colors reflected in the floor rug, cushions and the wall painting. Truly inspiring !


Combination: Pink+Blue+Yellow(all in pastel)


Saturday, November 14, 2009

~Martha I am Not~

I came across a simple painting project in an article from an old issue of Martha Stewart Living. I like to clip articles from various magazines and store them in a plastic sleeve in a binder. I have planned on doing this simple project for some time. I thought I would jump on the chalkboard paint bandwagon and attempt what I thought would be a quick and easy project! There are so many projects out there in blogland that use chalkboard paint. 


Well, Martha always makes it look easy.


 I took my small Ikea Fira mini chest of drawers that I used to store my sewing supplies and spray painted it with Heirloom White (jumpin' on the "Heirloom White" bandwagon too).


I followed Martha's directions, painted on the chalkboard paint then attempted to paint a red border. This is where the whole project fell apart. The tape I used caused the red paint to bleed through and now I have a mess. Why is it when you attempt something you think will be easy it ends up being a headache!


I have come to the conclusion, that 
I am not Martha
I am trying to fix my red mess and hopefully can show some after photos. Stay tuned....

Wednesday, November 11, 2009

~Lest We Not Forget~

In Canada we remember our fallen soldiers and those that are still in service on November 11, Remembrance Day. We wear a poppy on our left side in honour and remembrance. The symbol of the poppy came from the observation of poppies growing over fallen soldiers graves in Flanders Fields. Lieutenant-Colonel John McCrae, a medical officer with the Canadian Forces, penned the poem that every Canadian child learns in school, "In Flanders Fields." Poppies are a perennial, re-seeding and growing year after year. They represent hope and reassurance. I remember my favourite colour in my pencil crayon box was named "Poppy Red." Maybe that is why I love red throughout my house.


In Flanders Fields the poppies blow
Between the crosses row on row,
That mark our place; and in the sky
The larks, still bravely singing, fly
Scarce heard amid the guns below


We are the Dead. Short days ago
We lived, felt dawn, saw sunset glow,
Loved and were loved, and now we lie
In Flanders Fields.


Take up our quarrel with the foe:
To you from falling hands we throw
The torch; be yours to hold it high.
If ye break faith with us who die
We shall not sleep, through poppies grow
In Flanders fields

~Lieutenant Colonel John McCrae~

Monday, November 9, 2009

~Slipcovered Armchair~

I love slipcovers. They are a great way to transform a piece of not-so-pretty furniture. This armchair was part of a set that my parents bought in the 70's. Even after 30 years the upholstery and structure has held up. I loved this chair as a child so when my parents were disposing of the set years ago I snapped this piece up. It sat in its original snot green upholstery for so long until my husband gave me an ultimatum - recover it or out to the dumpster it goes. At that time I had about 3 chairs sitting in the basement waiting for me to make them over. I am a bit of a procrastinator. I have a hard time deciding on colours, fabrics, etc. There  are always too many options. We were moving to the US and he didn't want to be carting around junk (those were his words - not mine - I see a diamond in the rough). 


~before~

I went out an got some decorator's canvas and slipcovered the old 70's armchair. This was before my blogging days so no step-by-step photos. It is quite easy though. You measure each part of the chair, cut out a square of fabric, pin the pieces together with wrong side of fabric facing out (I use safety pins), lightly draw in pencil the stitching line and then sew! 


~after~

I realize that after looking at your room through a photo you notice things like the jumble of cords in the corner and our wedding photo that I thought I hung low enough still looks too high!

This post is attending:
Metamorphosis Monday at Naps Between the Porch
 DIY Day @A Soft Place to Land
Transformation Thursday at the Shabby Chic Cottage

and The DIY Showoff
*edited December 19th: Miss Mustard Seed Furniture Feature Friday
*edited May 29th: Funky Junk's SNS

Friday, November 6, 2009

~Sew Something in November~

   One of my favourite blogs is Creative Little Daisy. She is one talented lady with posts on decorating and sewing. This month she encourages everyone to dust off their sewing machine and sew something this November. My love for sewing started when I was about 4 years and my mom taught me how to sew buttons onto fabric. I loved searching through her button jar and just sewing buttons onto scraps of fabric. I believed they were jewels! When I was 8 years old I began to design and sew dresses for my Barbie dolls. I draped fabric over the doll, pinned and then sewed the outfit by hand. It wasn't until I was about 10 that my mom finally let me use her machine. I do recall breaking mom's sewing machine from all the little things I made. I think it was then that my love affair with fabric began! I LOVE fabric stores. The colours, patterns and textures get the creative juices flowing. I even worked at one when my kids were little, but that was bad news. I spent all my pay cheques on fabric! I love to collect fabric - I have bins of fabric with the hope of making something one day.
    Using fabric is a great way to add warmth and colour to your home. I have made pillows for the sofa, bed, curtains, duvet covers, slipcovers, table runners, etc. You name I probably made it!
   One of my favourite fabric designers is Amy Butler. You can check out her amazing site here. I have made a few things with her fabric. They are so inspirational, maybe because I am child of the 70's and these fabrics remind me of that bygone era.
 One of my favourite projects was a baby quilt, crib bed skirt and pillow I made for my niece when she was born. I have photos on another computer and need to post them. But here are a few projects made with her fabric most recently....


* my daughter wanted me to mention that she was the lovely model!
Linking up to DIY Day at a Soft Place to Land

Wednesday, November 4, 2009

~A Few of my Favourite Things~

*this link is joining Show and Tell at the Romantic Home


I am busy working on a few projects around the house  - a laundry room spruce up, painting a desk and my sewing drawer organizer. In the meantime.....
I thought I'd share with you a few of my favourite things that I just adore. Some are heirlooms, items I bought or just things I made. I find that it is these personal favourites that make a house a home. Enjoy...

Pillows I made....

Dishes my Czech grandmothers gave to me over the years....

A painting I bought in Prague....

A old frame my mom bought in Prague that I spray painted silver and tarnished with some black paint.....

Dishes from Prague that were my great-great Aunt's....

A clear glass lamp I found at Homesense (I wanted one from Crate and Barrel but this was $100 cheaper!)
Hope you all have a great Wednesday. I can't wait to see what will be posted at the The Shabby Chic Cottage Transformation Thursday!

Tuesday, November 3, 2009

~Simple (and Cheap) Coat Hook Rack~


   Since my son can't be bothered to hang up his sweatshirts in his closet I decided to make him a row of coat hooks mounted to wood to hang behind his door. I was at the local hardware store and came across a bin of free bits of lumber. I can't resist anything free so I grabbed a few pieces that would be handy for future projects. I had some coat hooks that I purchased at Ikea about a year ago and had yet to use. Since my husband won't show me how to use the power saw (he is afraid I might cut off my fingers - I think he may be onto something!) I had to use the handy dandy hand saw.


I measured my length - you can customize to whatever length suits you.

I sanded the edges smooth with my hand dandy sanding block.

Next step is to prime. I used a spray on primer - quick and easy. Dried within an hour and ready for paint!

I used Benjamin Moore's Aura Paint (Caliente is the colour - low VOC, no odour and dries in 1 hour)
I am definitely promoting them because they give me such an amazing discount (I am in there all the time - I love colour and am always grabbing paint swatches)
I sanded the edges to rough it up a bit.

Then I drilled holes (only power tool I know how to use!) for the screws to mount onto the wall. 

Using special drywall screws I mounted the rack onto the wall. The screw will be covered up with a hook.

Ta-da!
Now I hope I won't find his sweatshirts and hats all over the floor!


Linking to:
Kimba's Place at A Soft Place to Land

and
Thrift Decor Chick's

and
Today's Creative Blog

and


*January 9, 2010