Tuesday, October 27, 2009

~Take a Picture~

        I have been snapping photos of various rooms in my house to publish in future posts. After uploading several photos I discovered that a great decorating tool is to view your room through a photo. A photo gives you a different point of view and allows you to see what works and doesn't work. It is like looking through someone else's eyes. 


     Take for instance this photo of my dining/living room I posted on a Before and After posting, I saw that the framed prints I had hanging on the left side of the dining room wall look too small for the space. The scale is just wrong. They don't balance out the prints on the opposite wall.


      I also noticed that I need a splash of colour such as hanging some of my china plates alongside the mirror. I also need to hang up the mirror, it feels too heavy sitting on top of the sideboard. I wish the sideboard could fit into the alcove on the side. I am going to have to search for something to fill that space, maybe a bar cart??? If this was my house I would nix the blinds and make some beautiful roman blinds, in some luxurious silk or crisp linen. Good thing decorating a house is always an ever evolving process that takes time to layer and add those details that make it a home. Use that camera as your tool to critique your space!


Friday, October 23, 2009

Simple art idea~


I love shadow boxes. They are a great way to display mementos and keepsakes. Even the most unusual objects, things you would never think to display can make great art. I think anything that is special to you makes beautiful art.
We LOVED living in Virginia (if you read older posts and stay with this blog you will find I go on and on about it....bear with me - it was such a wonderful experience for us) .......Back to this post.
I kept our license plates from Virginia and wanted to somehow incorporate them into our decor. I found this shadow box at Homesense (Homegoods in the US) that was perfect. I bought two because I have more than one plate to display. All I did was add sticky velcro to the back and to the fabric backing and voila - a great piece of art!


Now it is in my laundry room! I am going to hang another in my son's room!

Another one I did - sticking to the Virginia theme (you can insert your yawn here) is with a nail we got from the blacksmith at the museum from Jamestown, Virginia. It is the birthplace of North America (a little history lesson, just in case you didn't know). I just hot glued the nail to a piece of card stock. In the lower corner wrote where it was from and then just assembled the whole thing together. It hangs right by my front door. It is a great conversation starter when people come over for a visit!


Simple yet beautiful!

I am linking up with the Inspired Room - Beautiful Friday
**edited as of Oct 26 I am linking up with DIY Day at a  Soft Place to Land
and The Shabby Chic Cottage

Wednesday, October 21, 2009

Just paint it

I think paint covers a multitude of sins. Being a renter I would love to have a home to renovate as I see fit. But living in a temporary home you could easily not care about what it looks like and just convince yourself it is only a rental by not doing anything - living with all the ugliness. No! It is your home, your sanctuary! I have lived in a few homes both rental and my own where I have realized that the quickest and cheapest way to make a change is to paint the walls. Check out the wall colour of our dining and living room before we moved in. There was no way I was going to live with those walls (and that UGLY light fixture).


I got to work priming and painting a more neutral colour. Unfortunately, this house was built in the early 90's with pinky undertones so I couldn't use my favourite colour, Buttercream, from Benjamin Moore, it has green undertones that would REALLY bring out the pink in the carpet and tile. I went with Thousand Islands. After the paint was up, furniture in and switched out the light fixture (also hideous!) with a great one from a big box hardware store, the rooms looks fab! 


Cost: $60 paint and $179 for the chandelier!
I am going to link up for DIY Day at  A Soft Place to Land
also linking up at 

Tuesday, October 20, 2009

~Desks for the girls~


I am finally rid of this horrible flu that has caused most of the family to be flat on their backs.  Now I can get back to my to-do list!
My goal this week is to find my girls desks for their rooms. Both my girls are in high school which can supply them with gads of homework. They have both had inadequate work space in their rooms for homework and studying. I was inspired by this posting in Apartment Therapy's Ohdeedoh website. 


from Odeedoh


This one lucky girl got a surprise bedroom makeover. The desk and shelves are from Ikea. I like the modern "teen" vibe this room carries. My oldest daughter has similar tastes and I have made her a bulletin/memory board similar to the one in the photo except made with a fuschia taffeta. I wish I could convince her for pale grey walls. Being 15 with opinions of your own she wanted a bright apple green. Her furniture is black and we have fuschia accents in curtains, pillows and artwork.  
Currently her room is a mess and I will take photos once the desk is in, bed painted and dresser touched up. My younger daughter chose a beautiful violet for her walls, called African Violet. It has been fun to decorate her room. More on this later.... Back to the desk issue: I think I am going to get them the same desk from Ikea. I am going to use the same legs, base and top. I may spray paint the legs black or white. I'll wait until I get it home and see what inspires me. 

Ikea
I am liking this combination, but maybe with a glossy white top, legs either sprayed white or black. I might find a drawer unit too. Hmmm....with Ikea the possibilities can be endless. I am off tomorrow and might come back with more!

Thursday, October 15, 2009

Honey I Shrunk the Curtains!

In the summer I thought I would do a little cleaning of my Ikea curtains. The curtains are in the kitchen covering the sliding door that leads to the tiny postage stamp yard we have. Since I live in a rental, these curtains were re-purposed from our previous home. I can't wait to make some custom curtains when we find our dream home! (That's another story) My dog comes in and out constantly through that door so you can imagine what happens to white curtains dragging on the floor. I thought - I should wash them! I washed in cold water and hung to dry. When I hung them back up they sadly shrunk about 10 inches! This caused my creative juices to flow and I decided to trim them with some black linen. I found some black linen at the fabric store - 1/2 price - only $5 per meter (we are in Canada!) and simply sewed a panel on the bottom. I felt the black panel looked lonely, so I added some black grosgrain ribbon along the bottom and running up the sides. Got to love the trusty sewing machine!
(Sorry there are no before photos - I just started blogging and have yet to get in the habit of before shots!)


Ta-da!


I am linking up to the The Shabby Chic Cottage Transformation Thursday!

Wednesday, October 14, 2009

Little Picassos....

A great way to evoke the feeling of warmth and originality into your home is to use your children's artwork on display. I treat their work like I would any other painting that I have by using a mat and frame to "house" their masterpiece. The only cost is the frame and mat! I have a box full, I love buying frames when they are on sale. Target is a great place in the US, sadly I don't live there anymore. Here in Canada: Ikea, Michaels (when they are 50% off), Homesense (aka Homegoods in the US), Superstore/Lobelaws and Opus Art and Framing (a west coast art supply heaven) are great places to buy inexpensive frames. At
Opus I can get custom mats cut for a few dollars. It really gives the art a custom look. 
I love hanging the framed masterpieces around the house.  They evoke responses from almost everyone who visits. 
I apologize that the photos aren't the greatest. Still waiting for some bright light here on the "wet" coast!


Collage in the hallway....


 in the family room....


in the powder room....


on the fireplace mantel....


on another fireplace mantel.


*I am linking this to Frugal Fridays at the The Shabby Nest. I lack the creativity to create a new post (we are all fighting the icky flu) so I am re-cycling this one!

Tuesday, October 13, 2009

The "after" photos


Voila!

The dresser and bookcase in their final glory. I am thinking of getting a new frame for our one-of-a-kind print of Wayne Gretzky (on wall above bookcase) that my dear friend's late father made for us. FYI: There are only 3 prints made - and Wayne Gretzky has one! 


Before - sanded and primed


This was my childhood teak dresser. It was stained on top with no hope of rescue. The soft black paint looks great. The colour was a mis-tint from Benjamin Moore.


The desk before and after. I am going to paint the oak chair a beautiful deep red. I found it on Craiglist for $15! I am also shopping for a great big bulletin board and some shelving to put above the desk for my son's ever growing rock/shell/bug collection jars. I think his sisters are playing a joke on him - note the whoopie cushion on the seat!


***edited Oct 15/09: I linked up at the The Shabby Chic Cottage for Transformation Thursday
and to Kimba's A Soft Place To Land DIY Day!

Monogrammed Pictures


My kids all share a bathroom and hence share two towel bars. They kept using each other's towels and it created confusion. I came up with this simple way to identify whose towel belongs where with a monogrammed picture  frame. I have a box in my closet full of picture frames. I grabbed two sets that matched and removed the glass fronts. (I put the glass back in the box - you never know when you might need them!) I went to Michaels and bought small wooden letters, one for each child's initial and the "M" for our last name. I took out my trusty black spray paint (I love to spray paint!) and sprayed each letter. I took some light blue card stock and placed it in the frame and then put the mat on top. I used my handy dandy hot glue gun (another tool that is a must for DIY) and glued the initial in the center. Finally the frames were hung up in the bathroom over the towel bar where each child hands up their towel. Now they never argue over whose towel belongs to who AND it has cut down on laundry! It is a win-win situation!

Monday, October 12, 2009

Happy Canadian Thanksgiving

I am going to take some photos of the "after" shots of this week's painting projects. I am just waiting for a bright day. The weather has turned cold this weekend and the forecast is rain. Not surprising here on the west coast of Canada. We enjoyed a wonderful turkey dinner and have finally cleaned the kitchen!


 A hodge:podge of thoughts: One of my goals for this blog is to bring attention that good design can happen here north of the border. I love reading the many creative blogs that are out there on the Internet but there seems to be very few Canadian design blogs. There are the big names that are connected with my favourite Canadian design magazines (check out Canadian House and Home and Style at Home), but not the lowly domestic goddess that strives to create a home for her family with just her imagination, ingenuity and some good ol' elbow grease.


 I find that my style can be what I think is uniquely Canadian, or more specifically West Coast. I love a hodge:podge of styles (hence the name of my blog). I love simple lines, nothing overly stuffy. Lots of classic looks and colours. I love black with red thrown in along with hints of blue. 


Our family has had the most amazing opportunities to have lived in many different places. I have lived in the Prairies in Canada, in an urban center here on the west coast, lived in a suburb in Northern Virginia just outside of Washington DC for 2 1/2 years and only moved back to the west coast in Canada last year. I find that living in all the different geographical places has influenced the way I decorate our home. Living in Virginia was most inspirational. We lived in a beautiful 5 bedroom colonial. The architecture in that area is so different than what we find here in the west. I fell in love with the rich history of the area. We felt truly at home. I also felt like an ambassador of Canada there.  I looked forward to my piece of Canadiana that arrived in my mail box every month - my most fav decorating magazines! I shared them with my friends. What I miss the most is seeing the beautiful historical buildings that were everywhere. I miss visiting DC and driving through Georgetown and Dupont Circle as I salivated over the beautiful brownstones. I also miss Target!! Sniff....... 


This week I hope to bring to photos of some of my recent DIY projects that cost next to nothing. Stay tuned......

Our beautiful colonial in Virginia - sigh....


Our rental home we currently live in 

Saturday, October 10, 2009

Hmmm....I need to figure out how I can create a link when I mention another blog.

I linked in with Hooked on Houses

Being new to the world of blogging I am trying to get my name out there. I just linked up with the Hooked on Houses linking "party". I hope it worked!

I should know better - always prime before you paint! After slapping on a coat of paint I realized that the paint was just peeling off. After some scraping and sanding, the bookcase is ready for some primer. I used Zinser cover stain. Good stuff. Dries in a hour, which is good for an impatient painter like myself. Afterward I used Benjamin Moore Aura paint, another great paint for us impatient painters. I am currently letting the bookcase to dry thoroughly before I set it up! More "after" photos will follow. Stay tuned.......
Here is the "before" shot of the plain ikea bookcase.

Friday, October 9, 2009

Still painting......

I am still painting the furniture. Pictures are coming. There were two glitches this week.


One: I was impatient and didn't prime a bookcase and realized that under the lovely latex paint was an oil based varathane. Oil and water do not mix and you get a lovely paint that just peels off. I like to think of myself as a seasoned painter and have never done this. Rushing and skipping the most important step of priming just gives you more work.


Second glitch: The paint color reminded me of doggy doo or of a lovely glossy 70's brown. Instead of heading to the big box hardware store I hit my favourite paint store: Benjamin Moore. Their paint and expertise is worth every penny. I told  the consultant my sad story and she happened to have a mis-tint that was just the colour I was looking for and it was only $5! I love a good bargain.
A few coats later and the dresser looks fantastic. The sad stinky white desk looks polished and the bookcase.....well...still scraping off the paint.


Thursday, October 8, 2009

Bedroom: Bed Linen Set / Duvet and Pillow Cases

Bedroom are so much integral to one's home. Though it might not be the most open to view for guests, but it definitely plays a big role in your lifestyle and sleeping habits. A beautifully done up bed with linen that suit your taste and style is so soothing ! Take time to create the perfect atmosphere in your bedroom, enjoy the colors and texture, sense the style and get Inspired !!

Duvet and linen set can add a lot of color and versatility to one's bedroom, an easy way to keep changing the color and adding freshness..with changing seasons, important events, make the best use of colors available to add vibrancy.


Check out some lovely images of bed-linens and create your perfect look !


This linen set is so pretty and soothing, it provides a clean look as well as keeps it light. A perfect solution for bedroom with lots of positive colors !

I absolutely adore the pillow cases, the embroidered leaves are just amazing :)


This bedroom set is so full of energy and vibrancy ! The colorful mix of cushions in different frills and patchwork can enliven any bed; especially love the pom poms on the pink cushion.

The brightness of the room with stark white wall makes the perfect background for the lovely colors. Keep the wall color neutral with colorful linen, too much of color contrast can be unsettling.


With wall in neutral white the colors of the quilt and patchwork cushions are simply captivating !

The under water scheme of blue and yellow is so beautifully brought out in the melange of pillows and cushions. I am so in love with the sequined mermaid pillow.

It is a great idea to choose your colors and pick pillows in different designs, it keeps the design interesting while adding elegance to your room.


If you like variety and re arrange your home with the changing seasons then this one is too good to miss. While the linen-set is quite simple with no extra frills or cushions, it still is full of freshness of spring. An easy way to get the outdoor cheer inside.

The side table in rattan and the simple arrangement of leaves in a glass brings out the very best!


I so love this !! Everything here is so colorful and vibrant, the blue and green is an unusual combination but the bed throw is so captivating ! The best combination for the gypsy girl in you :) Check out the details in the cushions, quilt and pillows, each of them have so much interesting happening.

The Chinese umbrellas is an interesting touch though much less practical ;)


This is for the more traditional who enjoy the clean look and brightness. If too much of colors bother your sleep then this is an ideal combination, soothing and peaceful.

The freshness of the pink and blue leaves motif is so relaxing !


Retro appeal ?! While this bedroom is a riot of colors, it still lends to the theme so beautifully !

The disco theme maybe? The lovely polka dots and zebra stripes in pink are such an unusual combination! The sequined cushions, retro chair,the stringed drape are so unique and charming !!

The round pink rug and the pink ball lights, all of them make this look classy and stylish !


Yet another inspiration in Pink, the canopy of sheer with colorful patchwork and border is so feminine. Add to it the ultra feminine butterfly cushion in bright pink and red, The colorful striped quilt is such a beautiful piece as are the matching pillows in satin.

This design is definitely too busy for some but which little girl will not like it ?


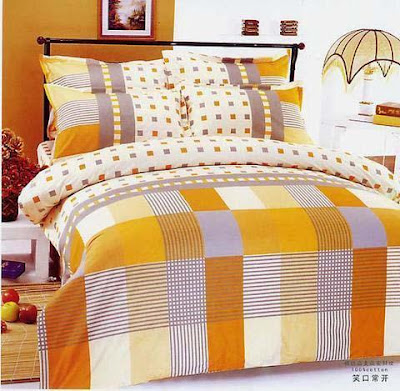
If neutrals are what you prefer and love the coolness and eternal appeal, this is just for you. The energetic orange is not too overpowering and in combination with white forms a perfect balance.

The design is simple and transforms the room into a relaxed comfort zone !


Blue is such a versatile color. In combination with green the look is stunning. The details of the bed linen and throw is just unsurpassed ! The beautiful quilting and thread embroidery add great texture and elegance.

I specially love the blue all around the place in bed rails, curtains and the lovely pillow covers. What an interesting set of toys too !


This is yet another set of duvet in blue. The cute motifs of sea horse and shell son the white and blue duvet is so adorable ! I totally dig the whole setting, simple white head board brings out the colors of the light blue stripes and blue curtains.

The starfish on the walls are just too cute to miss. A sure winner in elegance and beauty !


The romance of red! This bed linen set is just perfect for those with romance in mind. The energy of red and the lovely print of roses is just perfect for a couple's bed. This is easy to replicate and stunning at the same time.

The red accents in the room also add to the whole feel !


These ideas are just to help you decide on the color, theme look and feel of your bedroom. Take all the time to make your bedroom the comfort zone that it should be. Get Inspired !